Mastering the Rubik's Cube 3x3 puzzle relies on the layer-by-layer method, which breaks down the complex scramble into seven logical, repeatable stages: solving the white cross, completing the white corners, positioning the middle layer edges, forming the yellow cross, orienting the yellow corners, and finally permuting the corners and edges to solve the cube entirely.
Introduction to the 3x3 Rubik's Cube and Notation
The 3x3 Rubik's Cube is arguably the most famous mechanical puzzle in history. While it can look intimidating with its 43 quintillion possible permutations, solving it does not require a genius-level intellect or an innate photographic memory. Instead, it requires learning a structured set of algorithms—sequences of precise turns—and understanding how the pieces relate to one another.
Before diving into the core steps of the solution guide, it is essential to understand the anatomy of the puzzle and standard notation. A standard Rubik's Cube consists of six center pieces that never move relative to each other, twelve edge pieces that have two colors each, and eight corner pieces that have three colors each. The center pieces define the color of each face. For example, whatever color face has the red center piece must ultimately be the solved red side of the cube.
To follow any reliable 3x3 solution guide, you must master standard cube notation. Moves are represented by single letters:
- F (Front): The side facing directly toward you.
- B (Back): The side furthest away from you.
- U (Up): The top face.
- D (Down): The bottom face.
- L (Left): The left face.
- R (Right): The right face.
A letter by itself means a 90-degree clockwise turn of that face. A letter followed by an apostrophe (e.g., R') indicates a 90-degree counter-clockwise turn. A letter followed by the number 2 (e.g., U2) means a 180-degree turn of that face. Familiarity with this shorthand ensures that you can execute algorithms accurately without second-guessing your finger placements.
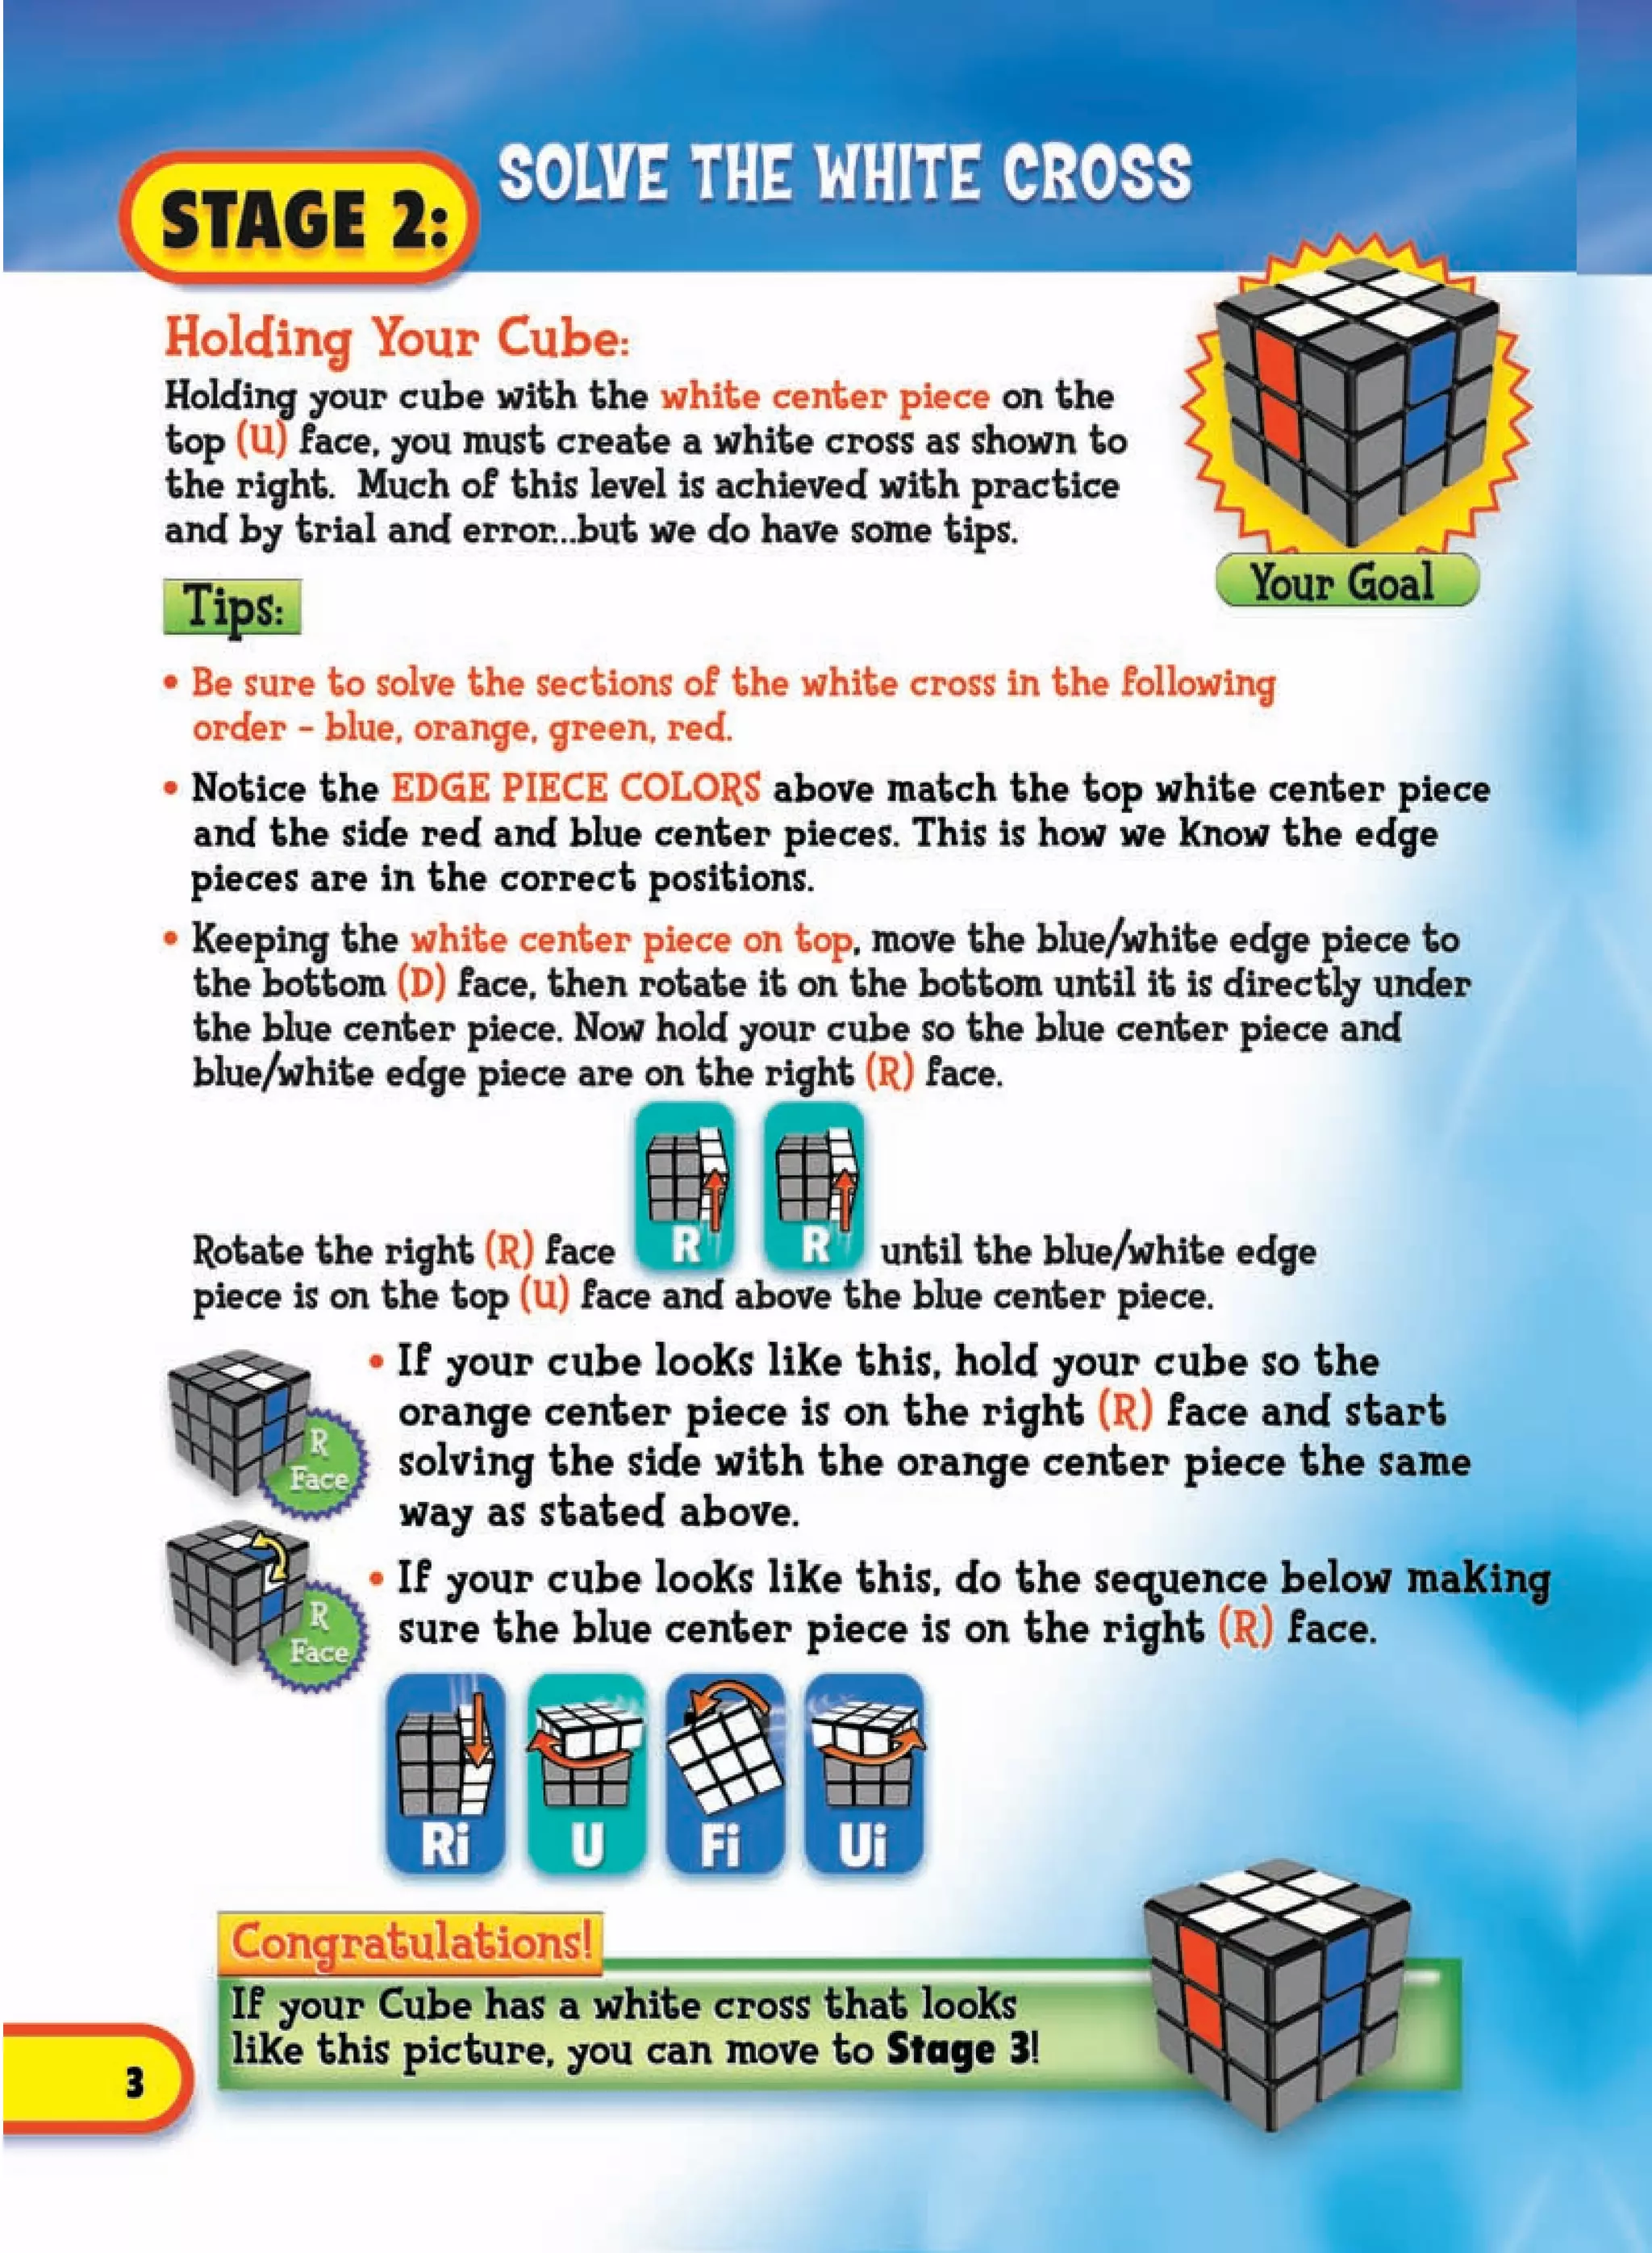
Step 1: Solving the White Cross
The journey to a solved cube begins on the white face, where your first objective is to build a white cross on the bottom of the cube. Many beginners make the mistake of trying to solve the entire white face at once without paying attention to the side colors. The white cross, however, requires that the edge pieces containing white also match the adjacent center pieces on the lateral sides of the cube (red, blue, orange, and green).
To build the white cross:
- Locate the yellow center piece and hold it facing up. This makes the white center face down.
- Search the middle layer for any edge piece that contains white. Bring these edges up to the top (yellow) layer by rotating the respective side.
- Align the top edge piece so that its non-white color matches the corresponding side center piece (for example, aligning the white-blue edge with the blue center).
- Rotate that face 180 degrees to drop the edge down to the bottom white face.
- Repeat this process for all four white-edge pieces until a clean white cross sits at the bottom, with the side stickers matching the center colors of the first layer.
Taking your time with this step pays dividends later. If your cross pieces do not match the side center pieces, your subsequent layers will be completely misaligned, forcing you to dismantle your progress and restart.

Step 2: Completing the White Corners
With the white cross firmly in place on the bottom, your next task is to insert the four white corner pieces to complete the entire first layer. A correct corner piece for this step must contain white, along with two other colors that match the adjacent center pieces.
- Scan the top (yellow) layer for any corner piece that features white.
- Rotate the top layer until that white corner is positioned directly above the spot where it belongs—between the two matching side centers.
- Depending on which direction the white sticker is facing (right, front, or top), execute one of the standard trigger sequences. The most common trigger is R U R' U'.
- Repeat this short four-move sequence continuously until the corner drops into the bottom layer with the white sticker facing downward and the side colors perfectly aligned with the adjacent centers.
- If a white corner is trapped in the bottom layer incorrectly, bring it up to the top layer by executing the trigger once, then reposition and insert it properly.
Once all four corners are correctly positioned, the bottom third of your cube will be completely solved, forming a solid white face on the bottom and a neat "belt" of matching colors around the lower perimeter.
Step 3: Positioning the Middle Layer Edges
Having conquered the first layer, you can now move on to the middle layer. Flip your cube upside down so that the completed white face is now on the bottom. The yellow face is now your top face. This orientation makes it much easier to track and manipulate edge pieces.
In this step, you will place the four edge pieces that belong in the middle layer without disturbing your completed white layer.
- Look at the top (yellow) layer and find an edge piece that does not contain yellow.
- Rotate the top layer until the front color of that edge piece matches a side center piece, forming a large vertical block of color (resembling an inverted "T").
- Examine the color on the very top sticker of that edge piece. Determine whether it belongs in the middle layer to the right or to the left.
- If the edge needs to move to the right, turn the top face away from the right (to the left), then execute the right-hand algorithm: U R U' R' U' F' U F.
- If the edge needs to move to the left, turn the top face away from the left (to the right), then execute the left-hand mirror algorithm: U' L' U L U F U' F'.
Repeat this process for all middle-layer edges. If an edge is stuck in the middle layer in the wrong orientation or wrong position, simply substitute it out by performing either of the algorithms with a dummy edge from the top layer, then reinsert it correctly.
Step 4: Forming the Yellow Cross
With the first two layers completely solved, your focus shifts entirely to the final (top) layer. Your first objective on the top layer is to create a yellow cross, mirroring what you did at the very beginning with the white cross. However, because the middle and bottom layers are already solved, you cannot simply scramble the pieces arbitrarily. You must use algorithms that preserve your prior progress.
Hold the cube so that the yellow face remains on top. Look at the pattern of yellow stickers currently visible on the top face. You will typically encounter one of four distinct states:
- The Dot (Center only): Only the yellow center is visible, or isolated corners obscure the edges. Execute: F R U R' U' F'. This transitions you to the "L-shape" state.
- The L-shape (9 o'clock): Two adjacent yellow edges form a small hook or "L" shape in the top-left quadrant. Hold the cube so the L points to the 10 o'clock position (top-left), then execute: F R U R' U' F'.
- The Bar (Line): Two opposite yellow edges form a straight horizontal line across the center. Hold the line horizontally, then execute: F R U R' U' F'.
- The Cross: All four yellow edges form a cross. You can skip this step entirely.
By applying the algorithm F R U R' U' F' sequentially based on your starting state, you will systematically transform the top face until a solid yellow cross appears.
Step 5: Orienting the Yellow Corners
Now that you have a yellow cross on top, your next goal is to make the entire top face solid yellow. This step orients the yellow corners so that their top stickers face upward, even if the side colors of those corners do not yet match the middle layer centers.
Keep the yellow face on top and inspect the corners of the top layer. You will notice that zero, one, or two corners already have their yellow stickers facing upward. Speedcubers refer to this step using various standard patterns, but the most reliable method for beginners is the Sune algorithm.
- Identify your pattern based on how many yellow stickers are facing up on the corners.
- If one corner is yellow on top, position that specific corner in the front-left position of the top layer.
- Execute the Sune algorithm: R U R' U R U2 R'.
- Check the top face. If it is not yet entirely yellow, reposition the cube or repeat the Sune algorithm until all four corners display yellow on the upper face.
Occasionally, executing Sune once will not solve all four corners immediately, but it will transition the cube into a recognizable sub-state. Simply re-orient the cube according to the specific layout of remaining yellow corners and repeat the algorithm until the entire top surface is uniformly yellow.
Step 6: Permuting the Yellow Corners
Your yellow face is now completely solved, but the side colors of the top layer corners likely do not match the surrounding center pieces. In this step, you will rearrange (permuting) the top corners so that they sit directly above their correct color sides.
- Inspect the top layer from the side. Look for two adjacent corners that share the same color on their outer sticker. This is often called a "headlights" pattern.
- If you find headlights, rotate the top layer until those matching corners align with their corresponding center color, then turn that face away from you (so the headlights are in the back).
- If no two adjacent corners match, execute the following algorithm from any angle: R' F R' B2 R F' R' B2 R2. This will create a matching pair. Once you have your headlights in the back, execute the exact same algorithm:
- R' F R' B2 R F' R' B2 R2
- Rotate the top layer to align all four corners with their respective side colors. At this stage, both the first two layers and all four corners of the final layer are completely solved.
| Step Number | Objective | Primary Algorithm / Move Sequence | Key Focus Area |
|---|---|---|---|
| Step 1 | White Cross | Side alignment + 180° turns | Bottom face |
| Step 2 | White Corners | R U R' U' (Repeated) |
First layer |
| Step 3 | Middle Edges | U R U' R' U' F' U F (Right) or U' L' U L U F U' F' (Left) |
Middle layer |
| Step 4 | Yellow Cross | F R U R' U' F' |
Top face |
| Step 5 | Yellow Corners | R U R' U R U2 R' (Sune) |
Top face orientation |
| Step 6 | Corner Permutation | R' F R' B2 R F' R' B2 R2 |
Top layer corners |
| Step 7 | Edge Permutation | R U' R U R U R U' R' U' R2 |
Final cube completion |
Step 7: Permuting the Final Edges and Completion
You have reached the final step of the solution guide. Only the four edge pieces of the top layer remain out of place. Inspect the top layer to see if any of the four edges is already completely solved against its center color.
- If you have one solved edge, place that solved face in the back of your grip, away from you. If all four edges are unsolved, you can perform the upcoming algorithm from any angle.
- Determine whether the remaining three unsolved edges need to move in a clockwise or counter-clockwise direction.
- To cycle the edges clockwise, execute the final algorithm: R U' R U R U R U' R' U' R2.
- To cycle the edges counter-clockwise, execute the mirror version: R2 U R U R' U' R' U' R' U R'.
- Inspect your cube. If it is not yet fully solved, execute the algorithm one more time from the correct orientation.
With this final sequence complete, all six faces of your Rubik's 3x3 puzzle will align in solid blocks of color. Congratulations on mastering the standard layer-by-layer method!
Common Troubleshooting and Practical Tips
Even experienced solvers occasionally run into snarls or parity errors caused by misremembering an algorithm sequence. If your cube appears completely broken or unsolvable in the final stages, check for these common pitfalls:
- Flipped Edge Pieces: If a middle-layer edge is flipped in place, remove it using the insertion algorithm and re-insert it correctly.
- Twisted Corners: Physical disassembly or accidental corner twisting can render a cube legally unsolvable. If an algorithm fails repeatedly despite flawless execution, check whether a corner piece was physically popped out and replaced incorrectly.
- Finger Tricks: Practice executing algorithms smoothly without pausing between individual turns. Developing fluid finger mechanics drastically reduces your overall solve time.
Frequently Asked Questions
Can I solve a Rubik's Cube without learning algorithms?
Intuitive solving is possible for the first layer and parts of the second layer, but the final layer permutation and orientation require established algorithms. Without algorithms, manipulating the top layer without disrupting the rest of the cube relies on trial and error, which is mathematically impractical for beginners.
How long does it take to learn the 7-step method?
Most beginners can learn and execute the 7-step method within a few hours of dedicated practice. Memorizing the algorithms typically takes two to three days of repetition, after which average solve times drop significantly with muscle memory.
Why do my pieces get messed up in Step 3?
The most common cause of accidental scrambling during the middle layer step is failing to match the edge piece with its corresponding center before executing the trigger algorithm. Always ensure you form the proper "T" shape on the side face before moving the edge into the middle layer.
Are all Rubik's Cubes solved using the same algorithms?
Yes, standard 3x3 Rubik's Cubes—regardless of brand, stickerless design, or magnetic adjustments—share the exact same mechanical geometry and mathematical principles, meaning identical algorithms apply universally.
What is the best way to memorize the algorithms?
Breaking algorithms down into smaller trigger trigrams (such as grouping moves like R U R' U') helps encode the sequence into muscle memory rather than relying on visual memorization of individual letter combinations.
Final Recommendation
To cement your understanding of this guide, practice each step in isolation before attempting a full continuous solve. Spend twenty minutes mastering just the white cross and corners until you can execute them without looking at reference notes, then progressively add the subsequent layers. Consistent, deliberate repetition builds the necessary muscle memory for swift, confident puzzle execution.
Image Gallery
Select an image to open it in a new tab.
Declan O'Connor
Higher Education and Campus Culture Reporter
