
Wiring a pool pump timer correctly ensures that your filtration system operates consistently, extending the lifespan of your pump motor while maintaining water quality. To achieve reliable operation, you must match the timer’s voltage rating to your specific pump requirements—typically 120V or 240V—and ensure all connections are housed in a weather-rated enclosure that meets local electrical codes for grounding and overcurrent protection.
Understanding the Role of a Pool Pump Timer
A pool pump timer acts as the central control mechanism for your circulation system. Beyond the convenience of automated scheduling, a timer protects your equipment from the wear and tear of manual operation and ensures that water is circulated through the filter and sanitization systems for the required daily duration. Reliability in this context means two things: the mechanical or digital precision of the timing mechanism and the electrical integrity of the circuit connecting the power source to the pump motor.
When the wiring is substandard—characterized by loose terminations, improper gauge selection, or exposure to moisture—the pump motor can suffer from voltage fluctuations. These fluctuations lead to overheating, shortened motor life, and, in severe cases, the tripping of circuit breakers or the melting of insulation. Reliable operation begins with a firm grasp of the electrical requirements dictated by your specific pump model.
Pre-Installation Requirements and Safety Protocols
Before opening your electrical panel or the timer enclosure, you must prioritize safety. Working with high-voltage pool equipment involves a significant risk of electrical shock, especially in a potentially wet environment.
- Power Disconnection: Always cut power at the main breaker panel. Use a non-contact voltage tester to verify that the lines are truly dead before proceeding.
- Compliance with the NEC: In the United States, pool wiring must adhere to the National Electrical Code (NEC), specifically Article 680, which covers swimming pools, fountains, and similar installations. This includes requirements for bonding, grounding, and the use of Ground Fault Circuit Interrupter (GFCI) protection.
- Gauge Selection: The wire gauge must match the amperage draw of your pool pump. Using a wire that is too thin will cause resistance and overheating. Consult the pump’s data plate to determine the full-load amperage (FLA) and select the appropriate conductor size, typically 12 AWG or 10 AWG for standard residential pumps.
- Weather-Rated Enclosures: Never install an indoor-rated timer on an outdoor pump setup. Ensure your junction box and timer enclosure are NEMA 3R rated or higher to prevent water ingress.
Identifying Your System: 120V vs. 240V Wiring
Most residential pool pumps operate on either 120V or 240V, and the wiring configuration differs significantly for each.
- 120V Systems: These use a single hot wire, a neutral wire, and a ground wire. The timer acts as a switch on the hot leg.
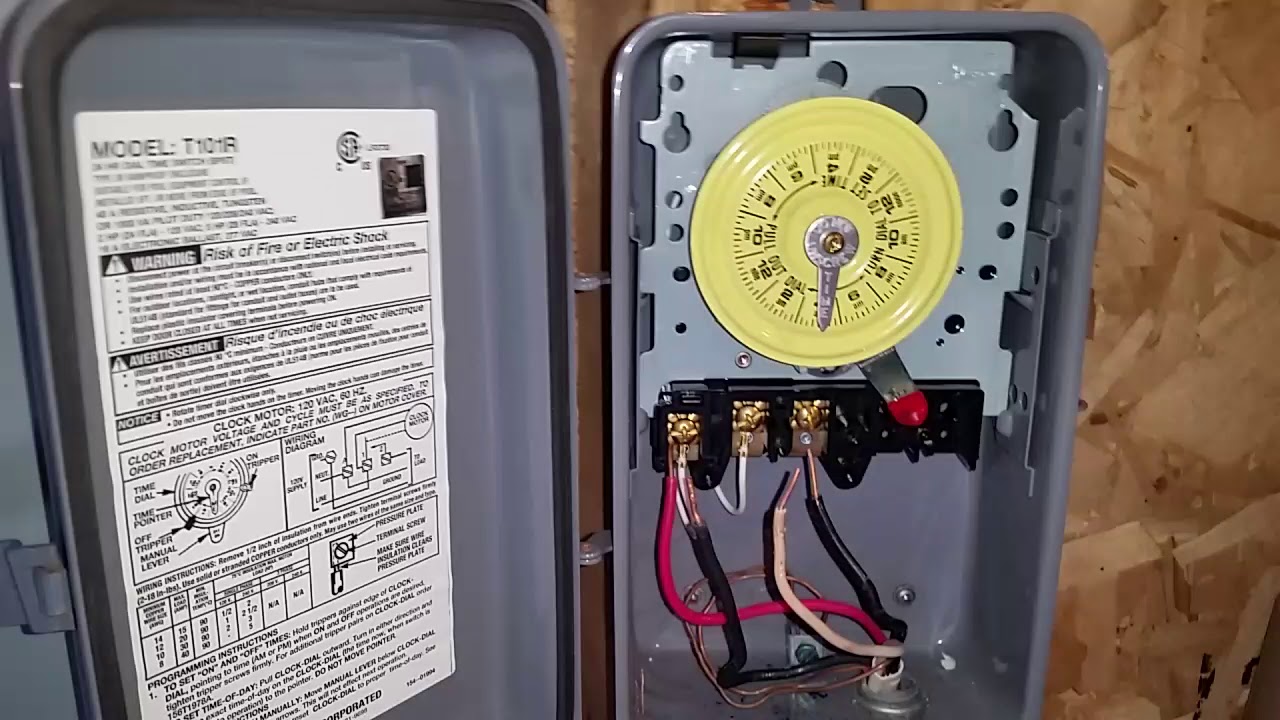
- 240V Systems: These use two hot wires (typically black and red) and a ground wire. In many residential applications, there is no neutral wire at the pump motor, though some modern digital timers require a neutral for the clock display. In a 240V setup, the timer must be a "double-pole" switch, meaning it breaks both hot legs of the circuit simultaneously when turned off.
Always verify your system voltage using a multimeter before beginning the installation. Wiring a 120V pump to a 240V circuit—or vice versa—will cause immediate and permanent damage to the motor windings.
Step-by-Step Installation Guidance
Reliable installation relies on methodical execution. Follow these steps to ensure a robust, lasting connection.
- Mounting the Timer: Secure the timer box to a post or a wall near the pump, ensuring it is level and accessible. Ensure the conduit enters the box from the bottom or sides, never the top, to prevent rain from running into the electrical components.
- Feeding Power to the Timer: Run your supply conduit from the breaker panel to the "Line" side of the timer. Secure the wires using appropriate conduit connectors and ensure the ground wire is bonded to the metal enclosure if required by local code.
- Connecting the Load: Run the wires from the "Load" side of the timer to the pool pump motor. Use flexible liquid-tight conduit for the final run to the motor to allow for slight vibrations and to provide a moisture seal.
- Terminating Connections: Strip only the necessary amount of insulation from the wires. Ensure that no copper is exposed beyond the terminal block. Tighten all lug screws firmly; a loose wire at the terminal block is a common cause of high-resistance heat buildup and eventual equipment failure.
- Bonding: Ensure the motor frame is connected to the pool’s bonding grid. This is a critical safety step that prevents stray voltage in the water, which can be lethal.
Comparing Mechanical and Digital Timers
When selecting your timer, consider the trade-offs between mechanical and digital technology.
| Feature | Mechanical Timer | Digital Timer |
|---|---|---|
| Interface | Physical "trippers" on a dial | LCD screen/Keypad |
| Complexity | Simple, intuitive | Higher learning curve |
| Precision | Low (minutes) | High (seconds) |
| Power Outage | Loses time | Usually has battery backup |
| Durability | High, robust components | Sensitive to extreme heat |
Mechanical timers are often preferred in hot, humid climates for their durability and lack of complex circuitry that can be fried by power surges. Digital timers, however, provide the flexibility to program multiple "on/off" cycles per day, which can be beneficial for optimizing energy consumption or managing variable-speed pumps.
Troubleshooting Common Issues
If your pool pump timer is not functioning as expected, start your diagnosis with the power supply.
- Pump Not Starting: Check the circuit breaker. If the breaker is tripped, investigate for a short circuit in the wiring or a seized pump motor. If the breaker is on, use your multimeter to check for voltage at the "Load" terminals of the timer. If there is power at the "Line" side but not the "Load" side, the timer’s internal contactor is likely faulty.
- Timer "Clicking" but Not Switching: This often indicates a failed motor or solenoid within the timer housing. Mechanical timers may have debris preventing the gears from turning.
- Intermittent Operation: This is frequently caused by loose wire connections. Over time, the thermal expansion and contraction of wires under load can loosen terminal screws. Every season, turn off the power and perform a "tug test" on your connections to ensure they remain tight.
- Excessive Heat: If the timer enclosure feels hot to the touch, disconnect power immediately. This indicates a high-resistance connection, likely caused by oxidized wiring or a failing contactor.
FAQ: Reliability and Best Practices
How often should I inspect the timer wiring? Perform a visual inspection every six months. Look for signs of discoloration on the insulation, rust around terminal screws, or evidence of insect intrusion, which is common in outdoor boxes.
Can I wire multiple pumps to a single timer? Generally, no. Each pump has a specific horsepower rating and amperage requirement. If you attempt to run multiple pumps on one timer, you will likely exceed the timer’s contact rating, leading to a fire hazard or welded contacts that prevent the timer from turning off.
Do I need a GFCI breaker for my pool pump? Yes, current electrical codes (NEC) generally mandate that all outdoor receptacles and hardwired pool equipment be protected by a GFCI. This provides an essential layer of safety by detecting ground faults and cutting power within milliseconds.
What is the "bonding" wire, and why is it important? The bonding wire connects all metal components of the pool structure—including the pump, heater, and metal ladders—to a common copper grid. This equalizes the potential between these objects and the surrounding earth, preventing electrolytic corrosion and reducing the risk of electric shock.
Why does my digital timer lose its settings during a power outage? Many budget-friendly digital timers lack an internal battery backup (a capacitor or coin-cell battery). If yours loses settings, it is either an older model, a lower-tier unit, or the internal battery has reached the end of its lifespan.
Professional Guidance and Final Recommendations
Wiring a pool pump timer is a manageable project for those with intermediate electrical knowledge, but it demands strict adherence to safety standards. If you are uncomfortable working with high-voltage panels or if your local jurisdiction requires a licensed electrician to perform all pool-related electrical work, do not attempt the installation yourself.
For optimal reliability, invest in a high-quality, weather-rated enclosure and ensure that all conduit runs are properly sealed. Periodically testing your GFCI protection is not just a suggestion—it is a critical maintenance step for your family’s safety. By maintaining tight, clean connections and choosing a timer suited to your climate and pump specifications, you will ensure years of reliable, automated pool circulation.

Image Gallery
Select an image to open it in a new tab.



Mateo Castillo
Decentralized Finance and E-Payments Strategist
