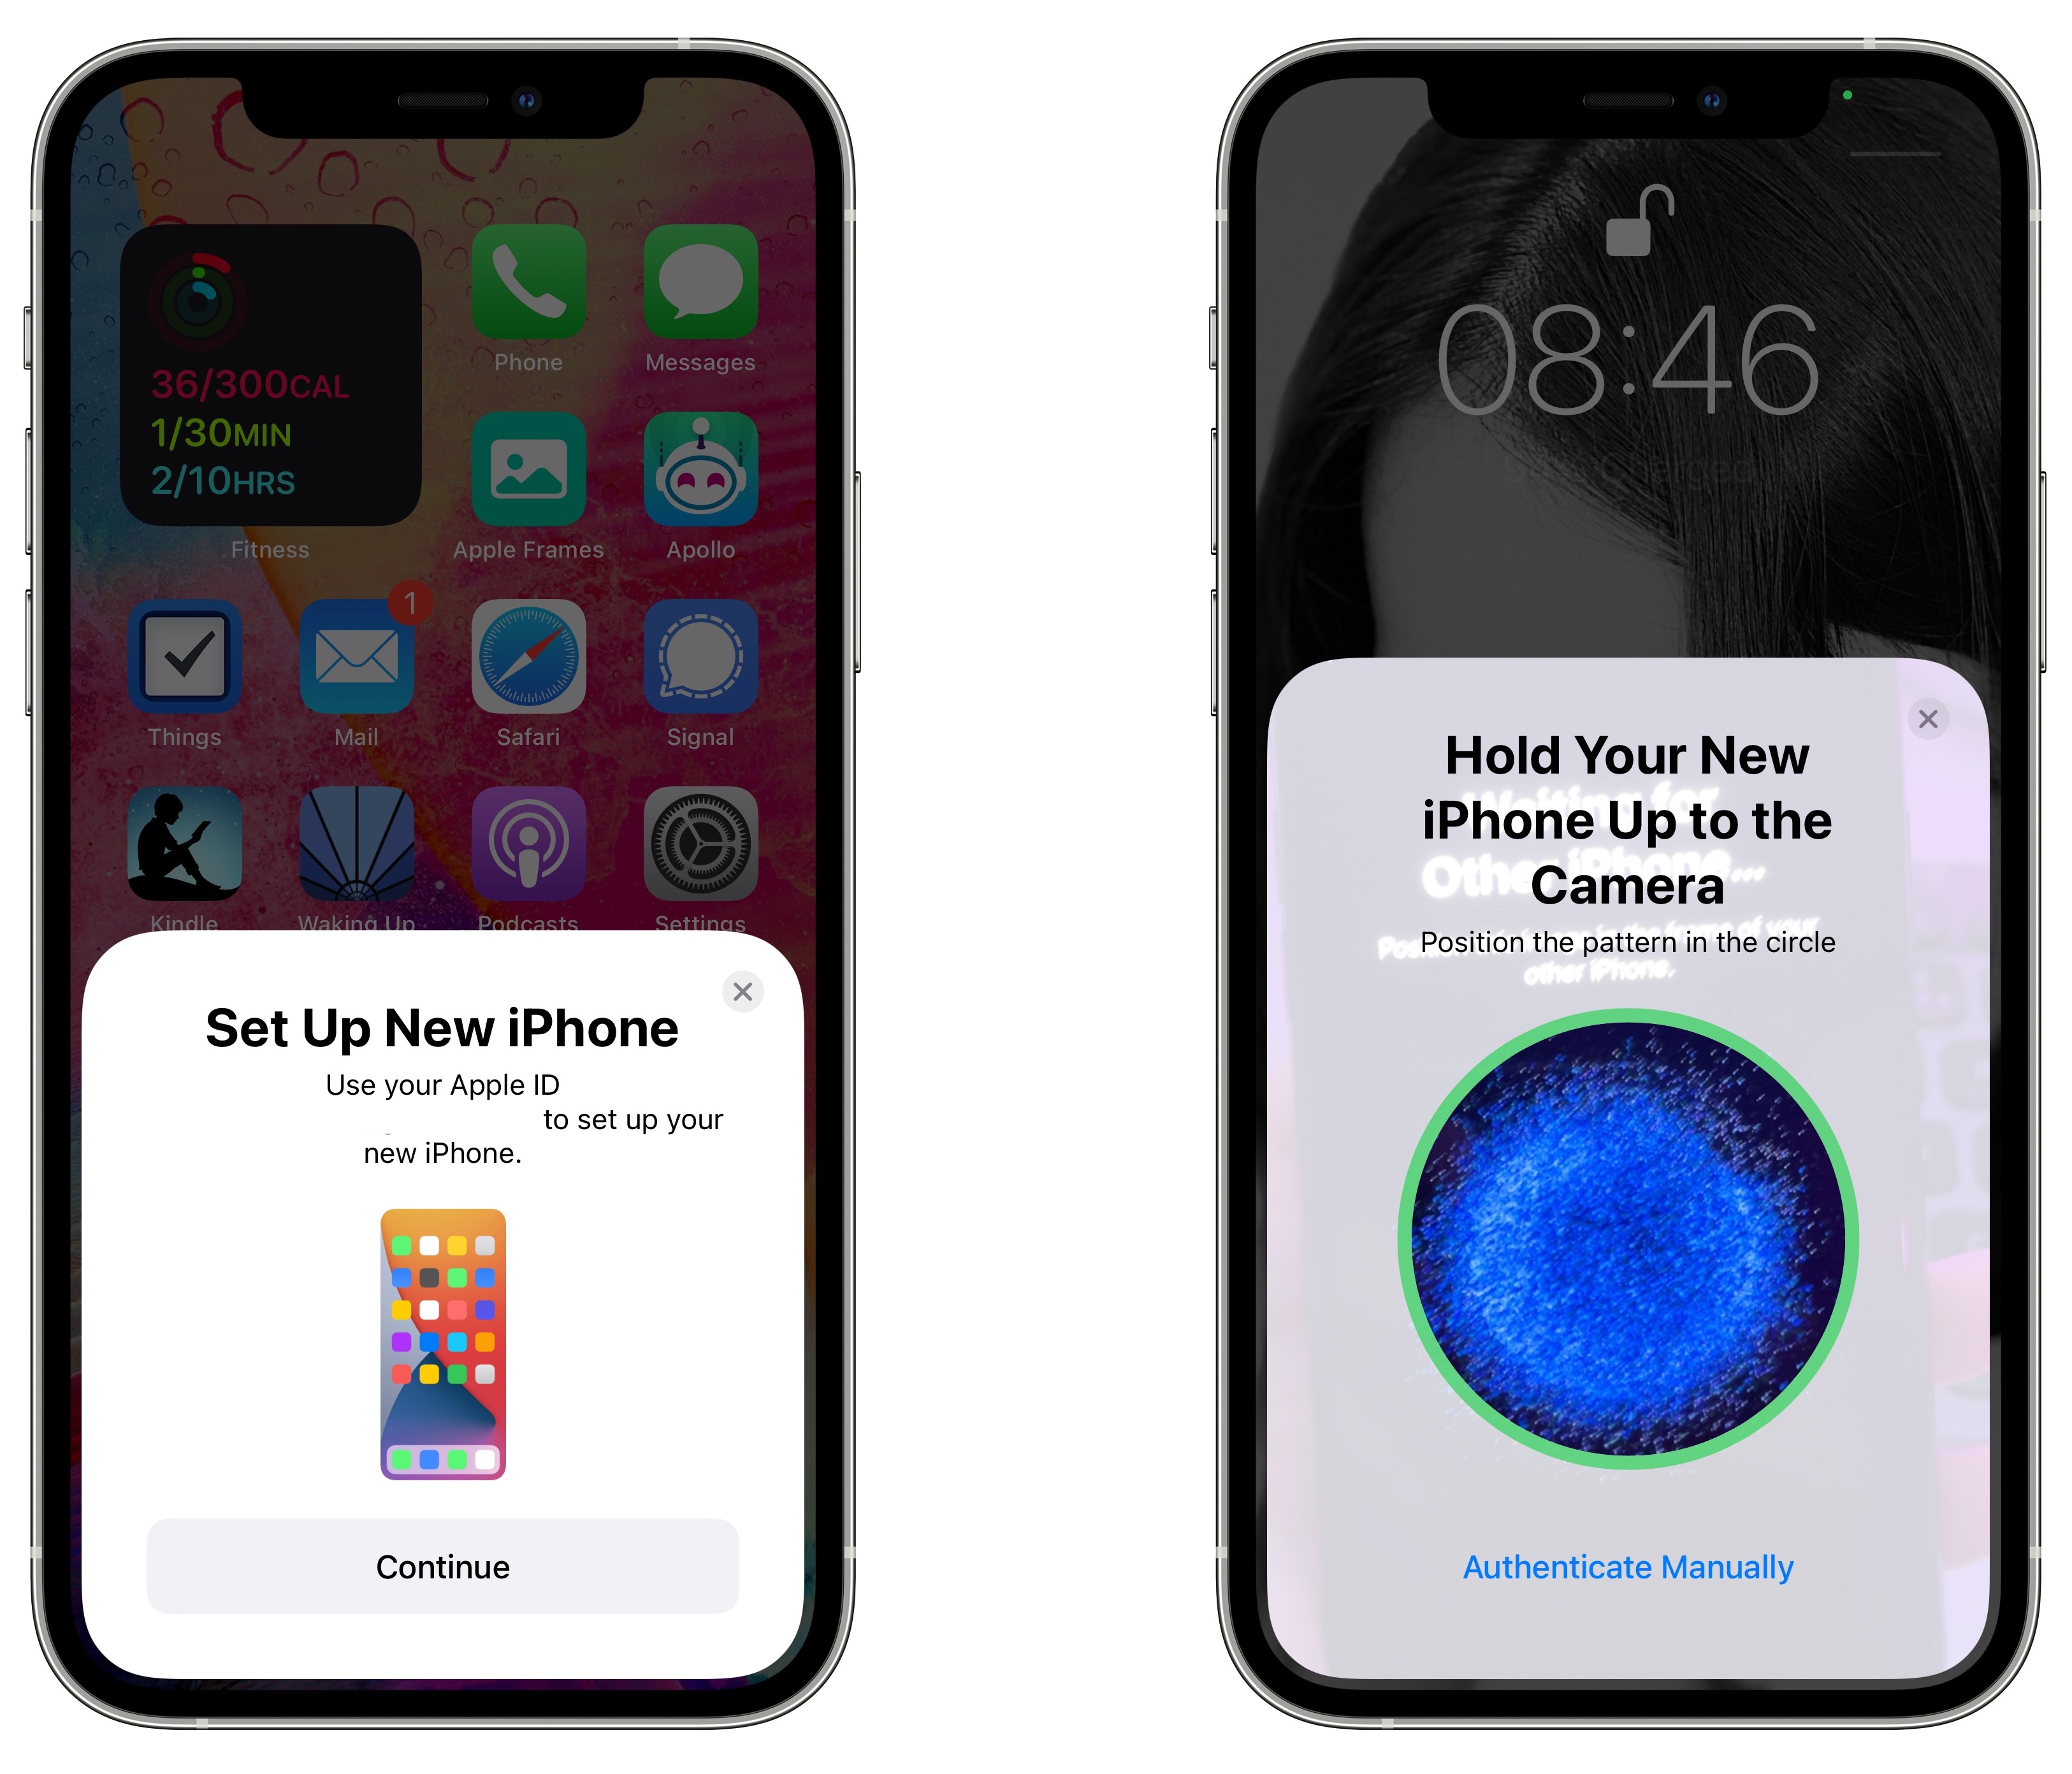
You can transfer apps to a new iPhone using Quick Start for a direct device-to-device migration, restoring from an iCloud backup, or using a local backup via a Mac or PC. Most users find Quick Start the most efficient, as it migrates app data, settings, and layouts wirelessly while both devices are nearby.
Moving to a new iPhone in 2026 is more streamlined than ever, thanks to advancements in iOS synchronization and high-speed wireless protocols. However, the process still requires careful preparation to ensure that not only the apps themselves but also their internal data—such as login states, game progress, and local documents—move over successfully. Whether you are upgrading to the latest iPhone 17 or 18 series or simply moving to a different model, understanding the nuances of Apple's migration ecosystem will prevent data loss and minimize downtime.
Essential Prerequisites for a Smooth Transfer
Before initiating any transfer method, you must verify several technical requirements. Failing to do so often results in "stuck" progress bars or authentication errors mid-transfer.
- Apple ID and Password: Ensure you have your Apple ID credentials ready. If you use multiple Apple IDs for different App Store regions or legacy purchases, you will need the passwords for all of them to authorize the download of those specific apps.
- Software Updates: The new iPhone must run a version of iOS that is equal to or newer than the version on the old iPhone. If your new device comes from the factory with an older build, you may be prompted to perform a software update during the initial setup phase.
- Wi-Fi and Power: A stable Wi-Fi connection is mandatory for iCloud and Quick Start methods. It is highly recommended to keep both devices plugged into a power source, as the migration process is processor-intensive and can drain the battery rapidly.
- Available Storage: Your new iPhone must have a storage capacity equal to or greater than the amount of data currently stored on your old device. While apps are re-downloaded from the App Store, the local data they hold must fit on the new hardware.
Method 1: Using Quick Start (The Recommended Way)
Quick Start is the primary migration tool provided by Apple. Introduced and refined over several iOS generations, it utilizes a peer-to-peer wireless connection (or a wired connection via a USB-C to USB-C cable) to clone your old device's environment onto the new one.
The Setup Process
To begin, turn on your new iPhone and place it near your current device. A prompt will appear on your old iPhone asking if you want to use your Apple ID to set up the new device. Once you confirm, an animation will appear on the new iPhone. You must hold the old iPhone over the new one to scan this animation with the camera, which establishes a secure, encrypted link between the two.
Choosing "Transfer from iPhone"
During the setup, you will be given a choice: "Download from iCloud" or "Transfer from iPhone." Selecting Transfer from iPhone creates a direct link between the devices. In 2026, with Wi-Fi 7 and advanced MIMO (Multiple Input, Multiple Output) technology, this process is incredibly fast. The system will migrate your system settings, Wi-Fi passwords, and Home Screen layout.
While the "shell" of the apps moves instantly, the actual app binaries are redownloaded from the App Store in the background to ensure you have the versions optimized for your new hardware. However, the local data (your login tokens and cached files) is moved directly from device to device.
Method 2: Restoring from an iCloud Backup
If you no longer have your old iPhone or prefer to set up your device from a remote location, iCloud is the most reliable alternative. This method relies on the cloud-based snapshot of your device.
Creating a Fresh Backup
Before starting, go to Settings > [Your Name] > iCloud > iCloud Backup on your old device and select Back Up Now. Ensure the backup completes successfully. In 2026, iCloud backups include high-level metadata for all your apps, though the apps themselves are fetched from the App Store servers during the restore process to save cloud storage space.
Restoring the Data
On your new iPhone, proceed through the setup assistant until you reach the Apps & Data screen. Select Restore from iCloud Backup. You will be prompted to sign in with your Apple ID. Choose the most recent backup from the list. The iPhone will begin restoring your settings and metadata. Your apps will appear on the Home Screen as darkened icons with a "Loading" or "Waiting" status. They will download and install automatically as long as the device is connected to Wi-Fi.
Method 3: Transferring via Mac or Windows PC
For users with limited internet bandwidth or those managing massive amounts of local data (such as high-definition video projects or extensive offline music libraries), a physical cable transfer remains the fastest and most secure option.
Using Finder on macOS
Since the removal of iTunes on macOS, Finder handles all device management. Connect your old iPhone to your Mac using a USB-C cable. Open Finder, select your device, and choose Back Up all of the data on your iPhone to this Mac. Crucially, check the box for "Encrypt local backup." If you do not encrypt the backup, your Health data, HomeKit settings, and saved passwords will not be included in the transfer.
Restoring the Backup
Once the backup is complete, connect the new iPhone. In the setup assistant, select Restore from Mac or PC. In Finder, select your new device and click Restore Backup. This method pushes the data over the physical cable, which is significantly faster than wireless methods for large datasets.
Comparison of Transfer Methods
| Feature | Quick Start (Wireless) | iCloud Restore | Computer (Wired) |
|---|---|---|---|
| Speed | Moderate to Fast | Depends on Internet | Fastest |
| Requirements | Both phones present | Stable Wi-Fi | Mac or PC + Cable |
| Data Integrity | High (Includes settings) | High (Requires recent backup) | Full (If encrypted) |
| Ease of Use | Highest | High | Moderate |
| Best For | Most users | Users without old device | Large data/Slow internet |
Manual App Transfer: The Selective Approach
Sometimes, you may not want to clone your old phone entirely. If you prefer a "clean slate" to improve performance or declutter your digital life, you can transfer apps selectively.
- Set up the new iPhone as a "New Device" during the initial configuration.
- Open the App Store and tap on your profile icon in the top right corner.
- Tap Purchased (or My Purchases).
- Here, you will see a list of every app ever downloaded on your Apple ID. You can filter by "Not on this iPhone" and tap the cloud icon next to specific apps to download them individually.
This method does not transfer app data or login information. You will need to sign back into every application manually, which can be time-consuming but results in a cleaner system.
Troubleshooting Common Transfer Issues
Even in 2026, the migration process can encounter hurdles. Here is how to resolve the most frequent complications.
Apps Stuck on "Waiting" or "Loading"
This usually occurs when the App Store is prioritizing other downloads or the Wi-Fi signal is intermittent. To fix this, ensure the device is plugged into power. You can also tap a specific app icon to prioritize its download. If many apps are stuck, try toggling Airplane Mode on and off to reset the network controller.
"App No Longer Available"
If an app has been removed from the App Store by the developer or Apple, it cannot be redownloaded. Even if the icon appears on your Home Screen after a transfer, the binary cannot be fetched. In this case, you must find a modern alternative in the App Store.
Authenticating Different Apple IDs
If you see prompts for passwords of Apple IDs you no longer use, it means some apps on your old phone were purchased under those accounts. You can either provide the passwords or tap Skip this Step. If you skip, those specific apps will not be transferred. It is often better to delete these apps on the old phone and re-purchase or re-download them using your current primary Apple ID.
Post-Transfer Verification and Security
Once the progress bar completes and you reach the Home Screen, the transfer is not quite finished. There are several "next actions" to ensure your apps are functional and secure.
- Bank and Financial Apps: For security reasons, most banking and high-security apps will require you to re-authenticate. Some may even require you to "un-register" the old device within the app settings before the new one can receive 2FA (Two-Factor Authentication) codes.
- Bluetooth Pairing: While most settings transfer, you will often need to re-pair Bluetooth devices like Apple Watch, third-party headphones, or car infotainment systems.
- eSIM Transfer: If your carrier supports it, iOS will prompt you to transfer your eSIM during the Quick Start process. Ensure your cellular service is active on the new device before wiping the old one.
- App Updates: Immediately go to the App Store and check for updates. Developers often release day-one patches for new iPhone hardware and iOS versions to fix compatibility bugs.
Frequently Asked Questions
Will my game progress transfer to my new iPhone?
Yes, provided the game uses iCloud Sync, Game Center, or its own cloud account (like a Riot or Epic Games account). If a game saves data strictly locally and you do not use the "Transfer from iPhone" or "Encrypted Computer Backup" method, you might lose your progress. Always check the game's settings to ensure cloud saving is enabled before switching devices.
Do I need to keep my old iPhone until the transfer is done?
Yes. You should not erase or trade in your old iPhone until you have verified that all apps and, more importantly, the data within those apps (like photos, notes, and messages) have appeared on the new device. Once you are satisfied, you can perform a factory reset on the old unit.
Can I transfer apps if I am moving from Android to iPhone?
You cannot "transfer" the actual Android app files to iOS because the operating systems use different architectures. However, you can use the Move to iOS app available on the Google Play Store. During the initial iPhone setup, this tool will scan your Android phone for free apps that are also available on the App Store and add them to a download queue for your new iPhone.
Why didn't some of my apps transfer?
The most common reason is that the app is no longer compatible with the version of iOS on your new phone, or it has been pulled from the App Store. Additionally, if the app was installed using a different Apple ID that you did not sign into during the setup, it will be skipped.
How long does it take to transfer apps to a new iPhone?
In 2026, a standard transfer of 100GB of data via Quick Start typically takes between 20 and 45 minutes, depending on your Wi-Fi environment. However, the background downloading of the actual app binaries from the App Store may continue for several hours afterward.
Final Recommendation
For the vast majority of users, Quick Start remains the gold standard for transferring apps. It strikes the perfect balance between speed and comprehensive data migration. Before you begin, ensure you have a fresh iCloud backup as a safety net, and keep both devices on their chargers until the "Hello" screen on the new device has been fully replaced by your familiar Home Screen layout and all apps have finished downloading.
Image Gallery
Select an image to open it in a new tab.


Declan O'Connor
Higher Education and Campus Culture Reporter
