
To use the Dash Egg Cooker, pour cold water onto the central heating plate using the included measuring cup, pierce the wide end of each raw egg with the pin located at the base of the cup, set the eggs on the cooking tray, and turn on the power switch. The appliance steams the eggs until the water completely evaporates, sounding a chime when finished.
Overview of the Dash Egg Cooker System
The Dash Egg Cooker—available in standard Rapid (6-egg capacity), Express, and Deluxe (12-egg capacity) models—is a compact countertop appliance designed to eliminate the guesswork of stovetop boiling. Instead of relying on timed immersion in boiling water, the unit operates using volumetric steam cooking.
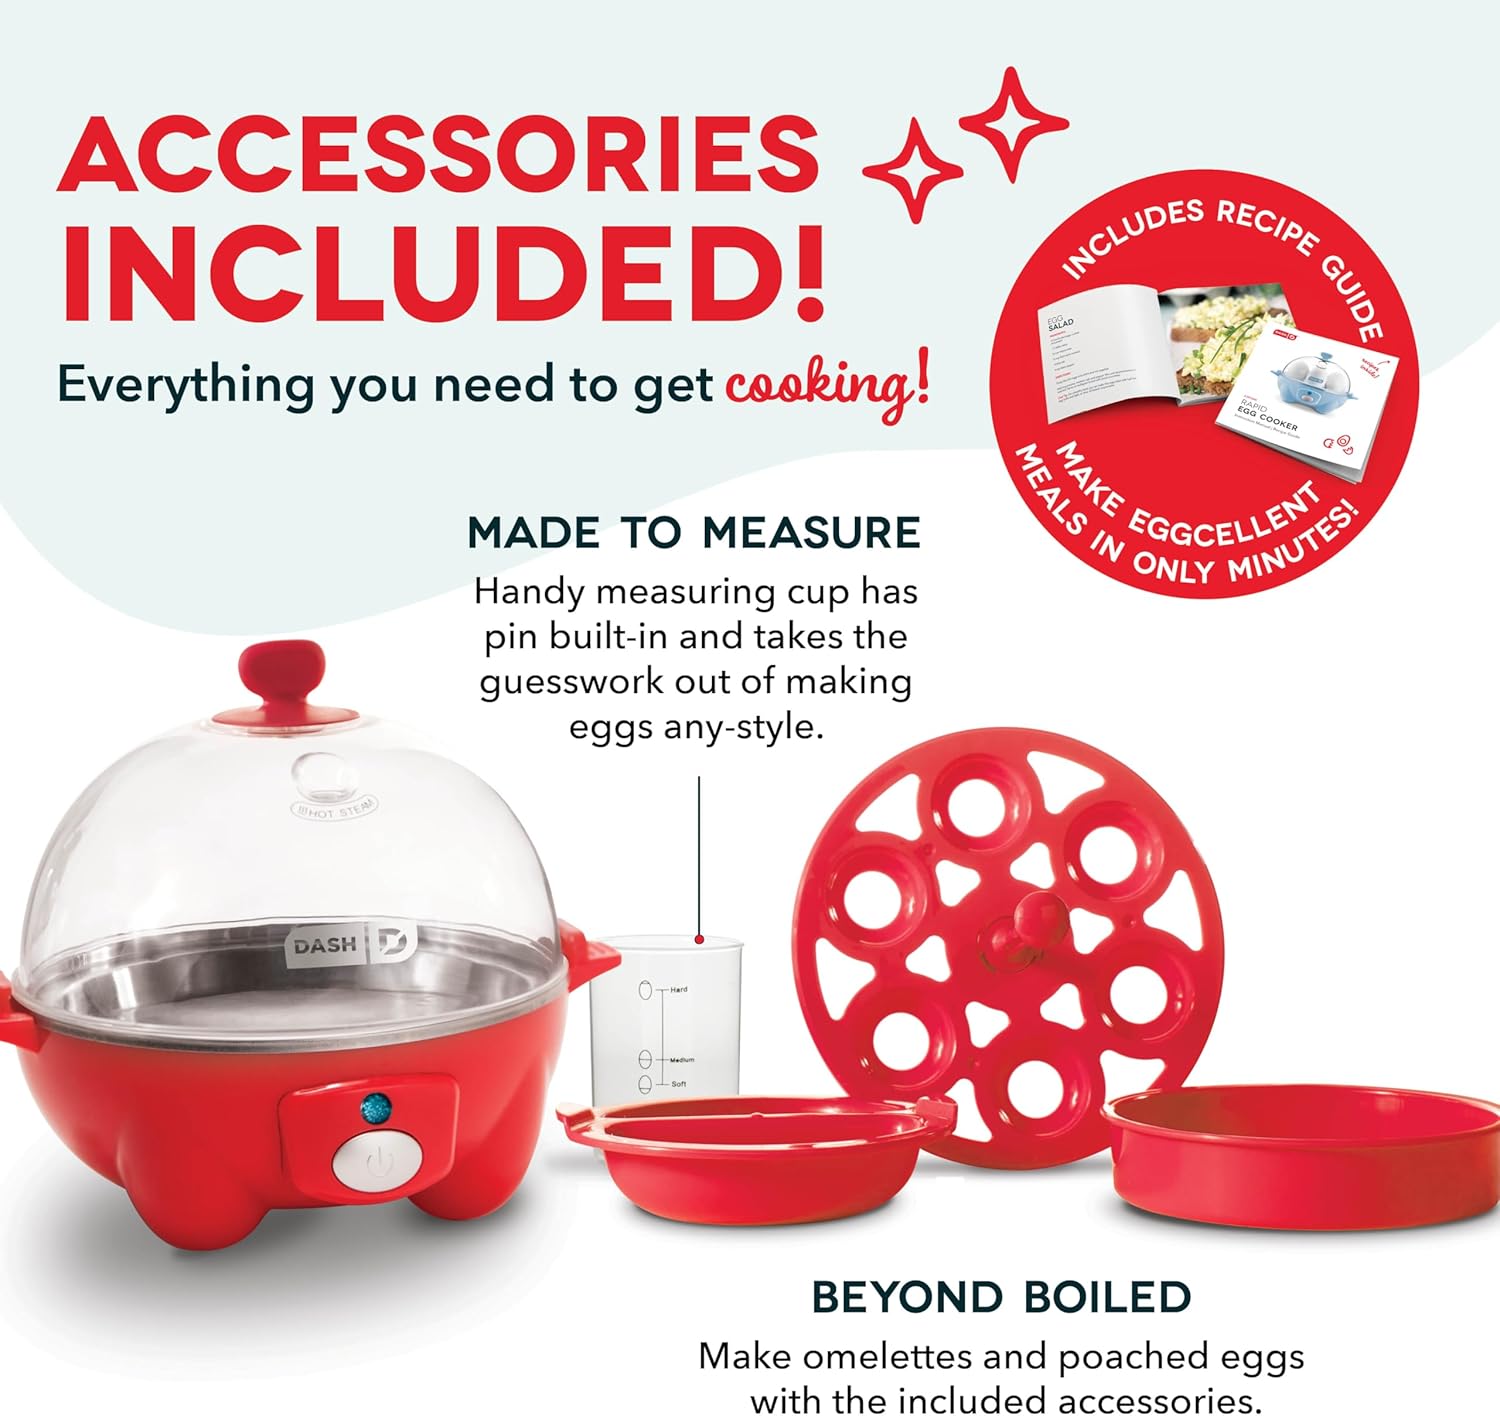
Understanding the function of each included component ensures seamless operation and extends the lifespan of the unit:
- Electric Base Unit: Houses the internal heating element, thermal cutoff sensor, power switch, and stainless steel or anodized aluminum heating plate.
- Clear Lid: Encloses the steam chamber and features a built-in steam vent to release excess pressure during cooking.
- Egg Boiling Tray: Sits directly above the heating plate to hold eggs in an upright, stable position.
- Measuring Cup with Piercing Pin: Features exact water gradation marks tailored to egg quantity and desired doneness. The base conceals a sharp stainless steel pin under a protective silicone cap.
- Poaching Tray: A non-stick insert designed to sit on top of the boiling tray for making poached eggs.
- Omelette Bowl: A curved non-stick tray designed for cooking mini-omelettes, scrambled eggs, or small steamed portions.
- Clear Lid (Steam Vent)
- Egg Tray / Poaching (Holds Eggs/Trays)
- Metal Heating Plate (Water goes directly here)
- Base & Power Unit (Indicator Light & Switch)
How Steam Precision Cooking Works
The operating principle of the Dash Egg Cooker relies on heat transfer via water vapor. When water is added to the heating plate and the power switch is flipped, the element rapidly brings the water to its boiling point of 212°F (100°C). Enclosed beneath the clear lid, the generated steam circulates around the eggs, cooking them rapidly and evenly.
The automatic shutoff mechanism works through thermal regulation rather than an internal countdown timer. Once all the measured water on the heating plate evaporates, the temperature of the plate rises rapidly past 212°F.
A thermal switch detects this sudden temperature jump and instantly shuts off the heating element while triggering an audible chime or buzzer. Because water volume directly dictates total steam duration, precise water measurement is the primary variable controlling how thoroughly the egg yolk and albumen set.

Step-by-Step Instructions: Hard, Medium, and Soft-Boiled Eggs
Preparing shell-on eggs is the primary function of the Dash Egg Cooker. Following the proper sequence ensures easy peeling and prevents shells from cracking under steam pressure.
- Measure Water
- Pour on Plate
- Pierce Wide End of Egg
- Place Pierced-Side Up
- Cover & Switch ON
- Ice Bath
Step 1: Measure Cold Water Accurately
Place the cooker on a clean, flat, heat-resistant surface. Use cold tap or filtered water to fill the included measuring cup. Locate the line corresponding to your target doneness (Soft, Medium, or Hard) and the exact count of eggs you plan to cook (e.g., 4 eggs).
Important: Counterintuitively, cooking a smaller number of eggs requires more water than cooking a full load. Fewer eggs leave greater vacant air volume inside the lid chamber that must be filled with steam, and fewer cold items absorb the heat. Always match the fill line to the exact number of eggs being prepared.
Step 2: Pour Water onto the Heating Plate
Pour the measured water directly onto the recessed metal plate at the base of the unit. Do not pour water over the eggs or into the surrounding plastic housing.
Step 3: Pierce the Large End of Each Egg
Remove the protective silicone cover from the bottom of the measuring cup to expose the stainless steel piercing pin. Take a raw egg straight from the refrigerator and locate its wide, rounded end—this end contains the internal air pocket.
Gently but firmly press the wide end of the egg down onto the pin until it punctures the shell with a slight click. Piercing allows expanding air pressure to escape during cooking, preventing the eggshell from cracking and leaking white into the chamber.
Step 4: Load the Eggs into the Tray
Place the main egg boiling tray onto the base. Position each egg into a tray ring with the pierced hole facing upward. Placing the hole at the top prevents liquid egg white from leaking out onto the heating plate.
Step 5: Secure the Lid and Begin Cooking
Place the clear lid onto the base, ensuring it sits flush within the rim. Turn the lid steam vent away from wooden cabinets or electrical outlets. Plug the power cord into a standard wall outlet and flip the power switch to the ON position. The indicator light will illuminate, and the water will begin boiling within seconds.
Step 6: Power Off and Transfer to an Ice Bath
When cooking is complete, the unit will sound a continuous chime or buzzer, and the indicator light will turn off. Flip the switch to OFF or unplug the unit immediately.
Using heat-resistant oven mitts, remove the lid by its handle, tilting it away from your face to avoid escaping steam. Use silicone tongs to remove the hot eggs and transfer them immediately into a prepared ice bath (a bowl filled with cold water and ice cubes) for 3 to 5 minutes.
The cold shock halts residual cooking instantly, sets the yolk texture, and causes the egg membrane to shrink away from the inner shell wall for clean, effortless peeling.
How to Poach Eggs in the Dash Egg Cooker
Poaching eggs in a traditional saucepan requires maintaining precise water temperature and adding acid to keep whites contained. The Dash Egg Cooker simplifies this process using steam poaching trays.
Fill Water to Poach/Medium Line
Oil Poaching Tray
Crack Eggs Into Pockets
Place Tray On Base & Cover
Switch ON
Remove Promptly with Silicone Spatula
Add Water: Fill the measuring cup with cold water up to the Medium or Poach line (depending on whether you prefer a runny or slightly firm yolk) and pour it directly onto the metal heating plate.
Prep the Poaching Tray: Apply a light coating of cooking spray, butter, or olive oil to the individual pockets of the poaching tray. Proper greasing prevents the cooked albumen from sticking to the surface.
Crack the Eggs: Crack one large egg directly into each individual poaching cup. Do not pierce poached eggs.
Assemble and Cook: Place the main boiling tray on the base first to act as a supportive platform. Set the loaded poaching tray directly on top of the boiling tray. Cover with the clear lid.
Start the Cycle: Plug in the unit and flip the switch to ON.
Unload and Serve: As soon as the chime sounds, switch the unit off. Remove the lid carefully. Use a heat-safe silicone spatula or spoon to gently loosen the edges of the poached eggs and slide them onto your plate.
Making Omelettes and Scrambled Eggs
The included omelette tray allows you to steam fluffy, evenly cooked personal omelettes or scrambled eggs without adding extra pan fats or oils.
- Water Fill: Fill the measuring cup to the Hard line (or designated Omelette line) with cold water and pour it onto the heating plate.
- Prepare the Mixture: In a separate small bowl, whisk 1 to 2 large eggs with 1 tablespoon of milk or water. Add salt, pepper, and finely diced ingredients such as shredded cheese, spinach, bell peppers, or cooked bacon bits. Avoid overfilling the omelette tray beyond its upper rim.
- Oil and Load: Lightly coat the omelette bowl with non-stick spray or butter. Pour the whisked egg mixture into the tray.
- Cook: Set the main boiling tray on the base, place the omelette tray on top, attach the lid, and turn the power switch ON.
- Serve: When the chime sounds, turn the unit off, remove the lid, and allow the omelette to rest for 1 minute inside the tray. Run a non-abrasive spatula around the perimeter to slide the omelette onto a serving dish.
Dash Egg Cooker Water Ratio and Cooking Time Guide
Cooking times in the Dash Egg Cooker are governed by water volume. The following standard reference guide outlines the approximate water levels and cooking durations for standard Large eggs (straight from the refrigerator) using a 6-egg Rapid model.
| Doneness / Cooking Style | Egg Quantity | Water Level (Measuring Cup Markings) | Approx. Steam Duration | Resulting Yolk & White Texture |
|---|---|---|---|---|
| Soft-Boiled | 1 – 3 Eggs | Soft (Upper Range Marks) | 6 – 8 Minutes | Fully runny yolk, soft set whites |
| Soft-Boiled | 4 – 6 Eggs | Soft (Lower Range Marks) | 5 – 7 Minutes | Warm runny yolk, set whites |
| Medium-Boiled | 1 – 3 Eggs | Medium (Upper Range Marks) | 9 – 11 Minutes | Creamy, jammy center; fully set whites |
| Medium-Boiled | 4 – 6 Eggs | Medium (Lower Range Marks) | 8 – 10 Minutes | Soft custard yolk; firm whites |
| Hard-Boiled | 1 – 3 Eggs | Hard (Upper Range Marks) | 13 – 16 Minutes | Fully solid, pale yellow yolk; firm whites |
| Hard-Boiled | 4 – 6 Eggs | Hard (Lower Range Marks) | 12 – 14 Minutes | Completely firm throughout; no green ring |
| Poached Eggs | 1 – 2 Eggs | Poach / Medium Line | 6 – 9 Minutes | Tender whites with liquid center |
| Omelette / Scrambled | 1 – 2 Eggs | Hard Line | 10 – 13 Minutes | Moist, fully set steam-cooked egg |
Note: Data based on standard Large eggs at standard refrigeration temperatures (~38°F / 3°C) used at sea level.
Environmental and Ingredient Adjustments
Because the Dash system relies entirely on heat absorption and steam condensation, external variables can alter internal doneness. Adjust your water levels slightly based on these three core operational factors:
| Variable | Physical Effect | Required Action |
|---|---|---|
| Larger Egg Size (XL/Jumbo) | More thermal mass to heat | Add slightly MORE water |
| High Altitude (>3,000 ft) | Lower boiling temp of water | Add 10-15% MORE water |
| Room-Temp Eggs | Higher starting temp of eggs | Add slightly LESS water |
1. Egg Size Variations
The graduated lines on the measuring cup assume you are cooking standard Large eggs.
- If using Medium eggs, fill water slightly below the designated line to avoid overcooking.
- If using Extra-Large or Jumbo eggs, fill water 1 to 2 millimeters above the indicated mark to ensure the larger thermal mass reaches full internal temperature.
2. High-Altitude Cooking
Water boils at lower temperatures as altitude increases due to decreased atmospheric pressure (e.g., ~202°F at 5,000 feet compared to 212°F at sea level). If cooking above 3,000 feet elevation, add approximately 10% to 15% more water than the cup indicates. The added water extends total steaming time, ensuring the albumen and yolk cook thoroughly despite the lower steam temperature.
3. Starting Egg Temperature
Recipes and markings assume eggs are removed directly from a standard refrigerator stored between 35°F and 40°F (1.6°C to 4.4°C). If using room-temperature eggs (common in many European countries or fresh farm eggs), reduce the water volume slightly below the line to prevent overcooking the yolk.
Cleaning, Descaling, and Maintenance
To maintain optimal heat transfer and hygiene, clean your Dash Egg Cooker after each use and perform periodic deep descaling.
- Unplug and cool unit completely
- Mix 1 tbsp white vinegar + 1 tbsp water
- Pour onto cold metal heating plate
- Let sit for 15-20 mins (Do NOT turn unit on)
- Wipe clean with soft damp cloth & dry thoroughly
Daily Cleaning
- Base Unit: Always unplug the unit and let it cool completely before cleaning. Never submerge the base unit, power cord, or plug in water or any other liquid. Wipe the base exterior and heating plate with a warm, damp cloth.
- Plastic Accessories: The clear lid, boiling tray, poaching tray, and omelette bowl are top-rack dishwasher safe. Alternatively, wash them by hand using warm water, mild dish soap, and a non-abrasive sponge.
Removing Mineral Buildup (Descaling)
Over time, tap water leaves behind mineral deposits (calcium carbonate scale), resulting in brown, white, or iridescent spots on the heating plate. If scale accumulates, it acts as an insulating barrier, causing the internal thermostat to trigger prematurely and leaving eggs undercooked.
To descale the heating plate:
- Ensure the unit is unplugged and completely cool.
- Mix 1 tablespoon of distilled white vinegar with 1 tablespoon of water (or use 1 tablespoon of lemon juice).
- Pour the liquid directly onto the metal heating plate.
- Allow the solution to sit for 15 to 20 minutes without turning the cooker on. The mild acid dissolves mineral scale effortlessly.
- Wipe the plate clean with a soft sponge or microfiber cloth.
- Wipe a second time with a plain, water-dampened cloth to remove residual vinegar odor, then dry thoroughly.
Troubleshooting Common Issues
1. The Buzzer Sounds, But Eggs Are Undercooked
- Cause: Mineral scale buildup on the heating plate, insufficient water, or using Jumbo eggs without adjusting water volume.
- Solution: Descale the metal plate using white vinegar. If the plate is clean, increase water volume by moving up to the next tick mark on the measuring cup.
2. Eggshells Crack During Steaming
- Cause: Eggs were not pierced, pierced on the wrong end, or micro-cracked prior to loading.
- Solution: Ensure you pierce the wide end of the egg where the internal air pocket resides. Place eggs in the boiling tray with the pinhole facing straight up. Avoid using eggs directly from hot water baths or eggs with hairline shell fractures.
3. Eggs Are Hard to Peel
- Cause: Skipping the ice bath transfer or using extremely fresh eggs.
- Solution: Immediately transfer cooked eggs into an ice bath for 3 to 5 minutes. Cold shock contracts the egg protein away from the shell wall. Note that ultra-fresh farm eggs naturally have higher pH levels that bond tight to the shell membrane; aging eggs for a few days in the refrigerator improves peelability.
4. Heating Plate Has Brown Stains After Cooking
- Cause: Mineral residue from evaporated tap water or raw egg white leaking onto the hot plate.
- Solution: This is normal thermal staining. Wipe the plate after every use. Clean burnt egg white using a soft sponge soaked in hot, soapy water or vinegar. Never use metal scouring pads or steel wool, which scratch the non-stick coating.
5. The Unit Will Not Turn On or Chime Continues
- Cause: Power switch left in the ON position from a prior cycle or unit tripped internal thermal fuse due to running dry without water.
- Solution: Turn switch to OFF, unplug, let cool for 5 minutes, add water, and plug back in. The buzzer on standard models requires manual shutoff by turning the switch to OFF or unplugging the power cord.
Frequently Asked Questions
Can you use the Dash Egg Cooker without piercing the eggs?
While you can cook unpierced eggs, skipping this step significantly increases the risk of eggs cracking during cooking. Piercing the wide end allows trapped air inside the shell's air cell to escape as it expands under heat. If unpierced, the building internal air pressure can rupture the shell, spilling raw egg white onto the steam tray and heating plate.
Why is there brown residue on the heating plate after cooking?
Brown residue is usually caused by minerals dissolved in your water supply that concentrate and scorch as the water fully evaporates. It can also occur if egg white leaks through a cracked shell onto the hot metal plate. This staining is non-toxic and can be removed by letting white vinegar sit on the cold heating plate for 15 minutes before wiping it clean.
How do you prevent poached eggs and omelettes from sticking to the trays?
Always apply a thin layer of butter, oil, or non-stick cooking spray to the poaching and omelette trays prior to adding the egg mixture. Steaming sets egg proteins quickly, and ungreased plastic or metal surfaces will cause the egg to adhere tightly, making removal difficult.
Why does the measuring cup require more water for fewer eggs?
Fewer eggs occupy less physical space under the lid chamber, resulting in a larger volume of empty air that must be saturated with steam. Additionally, fewer cold eggs absorb less heat energy overall. To maintain the necessary ambient steam density and cooking time required to cook 1 or 2 eggs, additional water is required compared to a full load of 6 eggs.
Can you steam vegetables or dumplings in the Dash Egg Cooker?
Yes. Small portions of soft vegetables (such as broccoli florets, asparagus spears, or thin sliced carrots) and small frozen items like dim sum or dumplings can be steamed using the egg tray or omelette bowl. Add water to the Hard line on the measuring cup, place the food items in a single layer, cover with the lid, and run a standard cooking cycle.
Final Recommendation and Next Actions
To achieve consistent results every time you use your Dash Egg Cooker, follow these core rules: always measure water carefully using cold tap or filtered water, pierce the wide end of each raw egg before loading, place the pierced side facing up, and transfer boiled eggs directly into an ice bath the moment the chime sounds. Performing a quick monthly vinegar soak on the heating plate will keep your appliance working efficiently and ensure perfectly cooked eggs for years to come.
Image Gallery
Select an image to open it in a new tab.



Vivian Cho
Executive IT and Emerging Technologies Reporter
