How to Put iPad Air into Recovery Mode: A Complete Step-by-Step Guide
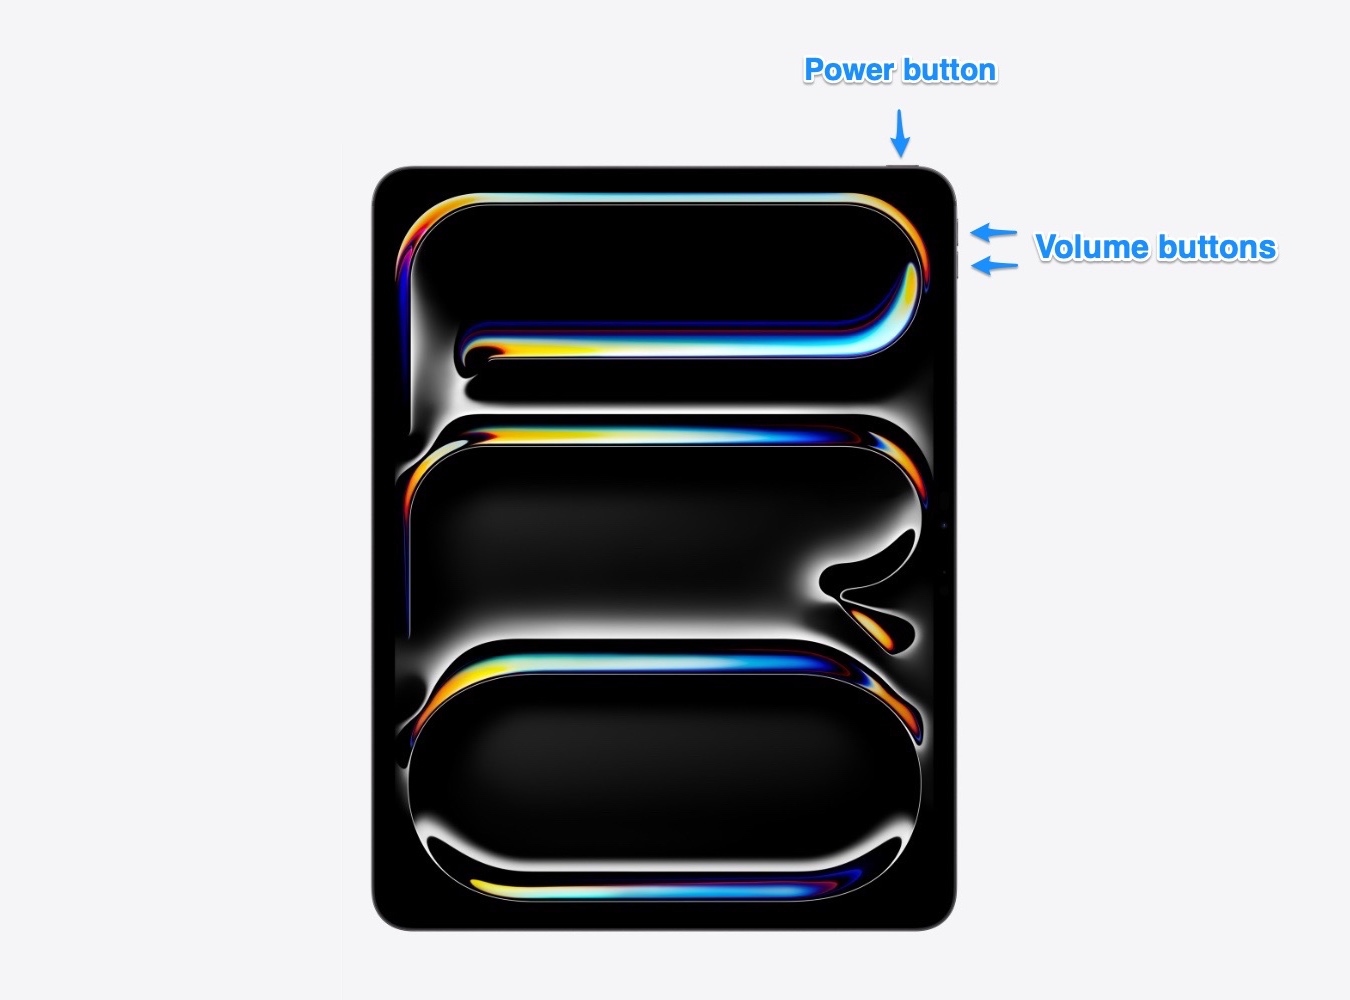
To put your iPad Air into recovery mode, connect the device to a computer. For models without a Home button, quickly press and release the Volume Up button, then the Volume Down button, and finally press and hold the Top button until the recovery mode screen appears. For models with a physical Home button, hold both the Home and Top buttons simultaneously until the recovery icon is displayed.
Recovery mode is a critical fail-safe built into the iPadOS architecture. It allows users to interface with a computer to restore or update the operating system when the device itself is unresponsive or unable to boot into the standard user interface. As of 2026, the iPad Air lineup remains one of Apple’s most popular tablets, bridging the gap between the standard iPad and the high-performance iPad Pro. However, even with the advanced stability of modern iPadOS versions, software conflicts, corrupted updates, or forgotten passcodes can necessitate a trip into the recovery environment.
Understanding how to trigger this mode is essential for any iPad Air owner. Whether you are using a legacy model with a physical Home button or the latest M2 or M4-powered iterations featuring an all-screen design and USB-C connectivity, the process is slightly different but equally accessible. This guide provides an exhaustive walkthrough of the prerequisites, the specific button sequences required for every generation, and what to do once your device is successfully in recovery.
Prerequisites and Preparation
Before attempting to enter recovery mode, it is vital to ensure you have the necessary equipment and environment ready. Entering this mode is a bridge to performing a factory restore or an emergency update, both of which require a stable connection to an external machine.
Hardware Requirements
As of 2026, the "Apple Devices" ecosystem has fully transitioned away from legacy iTunes software on most platforms. To proceed, you will need:
- A Mac or PC: If you are using a Mac, ensure it is running the latest version of macOS (such as macOS 15 or 16). On macOS, recovery functions are handled directly through Finder. If you are using a Windows PC, you should have the Apple Devices app installed, or the latest version of iTunes if you are on an older Windows build.
- A High-Quality Data Cable: For iPad Air models from the 4th generation (2020) through the latest 2026 models, you will need a USB-C to USB-C or USB-C to USB-A cable. For the 1st, 2nd, and 3rd generation iPad Air, a Lightning to USB cable is required. Ensure the cable is MFi (Made for iPhone/iPad) certified to avoid connection drops during the restoration process.
- Stable Internet Connection: The computer must be connected to the internet to download the necessary iPadOS firmware (IPSW files) from Apple’s servers.
Data Considerations
It is important to understand that recovery mode is often a precursor to a "Restore," which erases all data on the iPad. If your iPad is still somewhat functional, try to perform an iCloud or local backup before proceeding. If the iPad is disabled due to a forgotten passcode or a boot loop, your data may already be inaccessible. Recovery mode allows you to regain use of the hardware, but it cannot bypass encryption to save your files if you haven't backed them up previously.
Method 1: iPad Air Models Without a Home Button (Modern Models)
This method applies to the vast majority of iPad Air devices currently in use in 2026, including the iPad Air (4th Generation), iPad Air (5th Generation/M1), iPad Air (M2), and the most recent M4 models. These devices feature a uniform bezel with Touch ID integrated into the Top button rather than a circular button on the face of the device.
The Button Sequence
Because these models lack a Home button, the sequence relies on a specific rhythm using the volume keys and the power (Top) button.
- Connect the iPad to your computer: Use the appropriate USB-C cable. Open Finder (on Mac) or the Apple Devices app (on Windows).
- Press and quickly release the Volume Up button: This button is located on the side near the top of the device (depending on orientation).
- Press and quickly release the Volume Down button: Immediately follow the first press with the second.
- Press and hold the Top button: Continue holding this button even when the Apple logo appears.
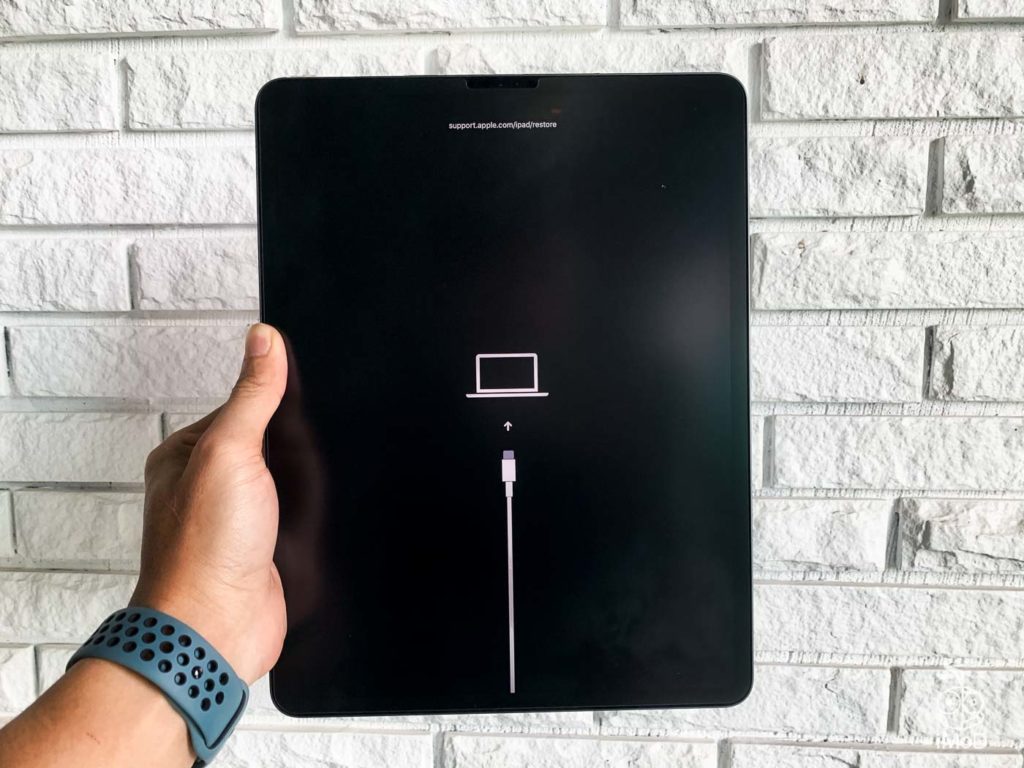
- Wait for the Recovery Screen: Do not let go of the Top button when you see the Apple logo. You must continue holding until you see a screen depicting a laptop/computer and a cable (the recovery mode icon).
Why the Sequence Matters
The logic behind this "Vol Up, Vol Down, Hold Power" sequence is to interrupt the standard bootloader. If you hold the Top button alone, the device simply attempts a standard restart. By cycling through the volume keys first, you send a hardware signal to the processor that the next power-on cycle should look for external instructions from the USB port rather than the internal storage.

Method 2: iPad Air Models With a Home Button (Legacy Models)
While these models are older, many iPad Air (1st Gen), iPad Air 2, and iPad Air (3rd Gen) units remain in active service for education or basic media consumption in 2026. These devices use a Lightning port and have a physical, circular Home button at the bottom of the screen.
The Button Sequence
The process for legacy models is simpler but requires more physical coordination, as you must hold two buttons at the exact same time.
- Connect the iPad to your computer: Ensure your computer is powered on and the management software (Finder/iTunes) is active.
- Press and hold both the Home and Top buttons: You must press them simultaneously.
- Keep holding through the Apple Logo: You will see the Apple logo appear on the screen. Do not release the buttons yet.
- Release when the Recovery Screen appears: Only once the screen shows the cable and computer icon should you let go.
If the device restarts normally and shows your lock screen, you likely released the buttons too early or didn't press them at exactly the same time. Try again, ensuring you maintain pressure until the recovery graphic is fully visible.
Comparing iPad Air Recovery Methods
The following table summarizes the differences in hardware and procedures based on the generation of your iPad Air.
| iPad Air Generation | Port Type | Primary Button Interaction | Computer Software (2026) |
|---|---|---|---|
| iPad Air (1, 2, 3) | Lightning | Home Button + Top Button | Finder (Mac) / Apple Devices (Win) |
| iPad Air (4, 5) | USB-C | Vol Up, Vol Down, then Top Button | Finder (Mac) / Apple Devices (Win) |
| iPad Air (M2 / 2024) | USB-C | Vol Up, Vol Down, then Top Button | Finder (Mac) / Apple Devices (Win) |
| iPad Air (M4 / 2026) | USB-C | Vol Up, Vol Down, then Top Button | Finder (Mac) / Apple Devices (Win) |
What to Do Once in Recovery Mode
Once the iPad displays the recovery icon, your computer will trigger a pop-up window. This is the most critical stage of the process, as the choice you make here determines whether your data is preserved.
Choosing Between "Update" and "Restore"
When the computer detects an iPad in recovery mode, it will offer two primary options:
- Update: This is the preferred first step. The computer will attempt to re-install iPadOS without erasing your data. This is useful for fixing "stuck" updates or minor system file corruption. If the update is successful, the iPad will reboot, and your apps and files will remain intact.
- Restore: If the "Update" fails or if you are entering recovery mode because you forgot your passcode, you must choose Restore. This will completely wipe the device and install a fresh, clean version of iPadOS. Once finished, you can set the iPad up as new or restore from a previous iCloud/Local backup.
The Downloading Process
After choosing an option, your computer will download the software for your iPad. Depending on your internet speed and the size of the iPadOS version (often exceeding 5GB in 2026), this may take 15 to 30 minutes.
Caution: If the download takes longer than 15 minutes, your iPad might automatically exit recovery mode. If the screen goes black or returns to a normal boot state, simply wait for the download to finish on your computer, then perform the button sequence again to put the iPad back into recovery mode.
Troubleshooting Common Issues
Entering recovery mode is usually straightforward, but hardware fatigue or software glitches can occasionally interfere.
The Computer Does Not Recognize the iPad
If you have connected the cable and performed the button sequence but nothing appears on your Mac or PC:
- Check the Cable: Swap the USB-C or Lightning cable for a known working one.
- Port Debris: Inspect the iPad's charging port for lint or dust. Even a small amount of debris can prevent the data pins from making a clean connection while still allowing the device to charge.
- USB Hubs: Avoid using unpowered USB hubs. Connect the iPad directly to the computer’s built-in USB port.
- Trust Settings: While you cannot "Trust" a computer on a disabled iPad, ensuring the computer is authorized in your general settings (if possible) helps.
The iPad Keeps Restarting
If the iPad cycles through the Apple logo and never reaches the recovery screen, you might be releasing the Top/Power button too early. Ensure you are holding the button until the recovery graphic appears, not just until the screen turns on. If the iPad is in a "Boot Loop" where it restarts every few seconds, the timing of your button presses becomes even more critical—try to start the sequence the moment the screen goes black during a loop.
Screen Stays Black (DFU Mode vs. Recovery Mode)
If the screen remains entirely black but the computer says it has "Detected an iPad in recovery mode," you have likely entered DFU (Device Firmware Update) Mode. This is a deeper state than recovery mode and is usually used by technicians. While you can still restore from DFU mode, the screen will not provide any visual feedback. If you prefer the visual guidance of recovery mode, disconnect the device, force a restart, and try the sequence again with quicker button presses.
Safety and Best Practices
When working with recovery mode in 2026, keep these safety tips in mind:
- Battery Level: Ensure the iPad has at least 50% charge before starting, or keep it connected to a high-power USB port. If the iPad dies during a firmware write, it could lead to a permanent hardware brick.
- Apple ID Credentials: If you are restoring the iPad, be aware of Activation Lock. You will need the original Apple ID and password used on the device to set it up again after a restore. Recovery mode does not remove Activation Lock; this is a security feature to prevent the use of stolen devices.
- Avoid Third-Party "Fix" Software: Many websites promote paid software to enter or exit recovery mode. In 99% of cases, these are unnecessary. The manual button sequences provided by Apple are the only officially supported (and safest) methods.
FAQ: Frequently Asked Questions
How do I exit recovery mode without restoring?
To exit recovery mode, simply disconnect the iPad from the computer and hold the Top (Power) button until the recovery graphic disappears and the Apple logo appears. If the iPad system is healthy, it will boot back to your lock screen. However, if the system is corrupted, it may loop back into recovery mode automatically.
Will putting my iPad Air into recovery mode void my warranty?
No. Recovery mode is a standard troubleshooting feature supported by Apple. Using it to update or restore your device does not void your hardware warranty or AppleCare+ coverage.
Can I put my iPad Air into recovery mode without a computer?
No. By definition, recovery mode is a state where the iPad is waiting for an external connection to receive a new operating system image. There is no way to perform a recovery mode "Restore" using only the device itself. If you do not have a computer, you can visit an Apple Store or an Authorized Service Provider for assistance.
Does recovery mode delete my photos?
Entering recovery mode itself does not delete anything. However, the actions you take after entering it (specifically choosing the "Restore" option) will erase all data, including photos, messages, and app data. Choosing "Update" will attempt to keep your photos intact.
What is the difference between a Force Restart and Recovery Mode?
A Force Restart simply cuts the power to the logic board and forces the device to reboot; it does not alter the software. Recovery mode puts the device in a state where the existing software is bypassed so that the computer can repair or replace the operating system files.
Practical Recommendation
If your iPad Air is experiencing performance issues, forgotten passcodes, or software glitches in 2026, recovery mode is your most powerful tool. Always attempt an Update first to save your data. If that fails, a Restore is the most effective way to return the iPad to factory-fresh performance. For users with the latest M-series iPad Airs, remember that the timing of the volume button presses is the key to success. If you find the process difficult, don't hesitate to use the official Apple Support app on another device to schedule a technician appointment, as they can perform these restores using specialized diagnostic tools.
Image Gallery
Select an image to open it in a new tab.
Omar Farooq
EdTech Innovation and Virtual Pedagogy Journalist
