Exporting QuickBooks data to Excel is a straightforward process achieved by navigating to the Reports menu, selecting a specific report, and clicking the "Export" or "Excel" button. This action generates a .xlsx or .csv file, allowing for advanced financial analysis, custom data visualization, and seamless integration with other business intelligence tools.
The Strategic Importance of Excel in Financial Reporting
While QuickBooks provides a robust suite of built-in reporting tools, the ability to move that data into Microsoft Excel remains a critical skill for accountants, financial analysts, and business owners. As of 2026, the integration between accounting software and spreadsheet applications has become more sophisticated, yet the fundamental need for "data portability" persists. QuickBooks, whether in its Online or Desktop iteration, is designed to record and categorize transactions. Excel, conversely, is designed for the manipulation, modeling, and longitudinal analysis of that data.
Exporting data allows for the creation of "What-If" scenarios that are not possible within the rigid framework of an accounting database. For instance, a business owner might want to forecast revenue based on a 15% increase in lead generation—a calculation easily handled by Excel’s formula engine but cumbersome to replicate in a standard QuickBooks Profit and Loss statement. Furthermore, Excel serves as a bridge for consolidating data from multiple entities. If a corporation manages three different QuickBooks files for three different subsidiaries, Excel is the environment where those files are merged into a single, comprehensive financial overview.
Prerequisites and System Compatibility
Before initiating an export, it is essential to ensure that your environment is configured correctly. In 2026, compatibility issues still arise, primarily due to mismatched software versions or insufficient user permissions.
Software Requirements
To ensure a smooth data transfer, you should be using a supported version of Microsoft Excel (typically Excel 365 or the most recent perpetual license version). QuickBooks Desktop users must ensure that their version of Excel is locally installed on the same machine or server as the QuickBooks application. QuickBooks Online users have more flexibility, as the export generates a downloadable file that can be opened in any spreadsheet viewer, including web-based versions of Excel.
User Permissions
Data security is paramount. To export financial reports or list data (such as customer or vendor lists), the user must have the appropriate permission levels assigned within QuickBooks. In most organizations, "Standard User" permissions may be restricted from viewing sensitive reports like the Balance Sheet or Payroll Summary. If the "Export" button is greyed out or missing, the first step should be to verify with the Administrator that your user profile has "Reports" and "Export" privileges enabled.
Data Integrity Check
It is a best practice to run a "Verify Data" utility (in QuickBooks Desktop) or ensure all transactions are matched and reconciled (in QuickBooks Online) before exporting. Exporting "dirty" data—data with unreconciled balances or unapplied payments—simply moves the problem from your accounting software to your spreadsheet, making the subsequent analysis unreliable.

Step-by-Step: Exporting from QuickBooks Online (QBO)
QuickBooks Online is the most common platform for small to mid-sized businesses in 2026. Its cloud-native architecture makes exporting relatively simple, as it does not rely on direct local application communication.
Exporting Financial Reports
- Navigate to Reports: On the left-hand navigation bar, click on "Reports."
- Select Your Report: Choose the report you wish to export, such as the Profit and Loss, Balance Sheet, or Statement of Cash Flows.
- Customize the View: Before exporting, use the "Rows/Columns" and "Filter" buttons to narrow down the data. It is much easier to filter data within QuickBooks than to delete thousands of rows in Excel later.
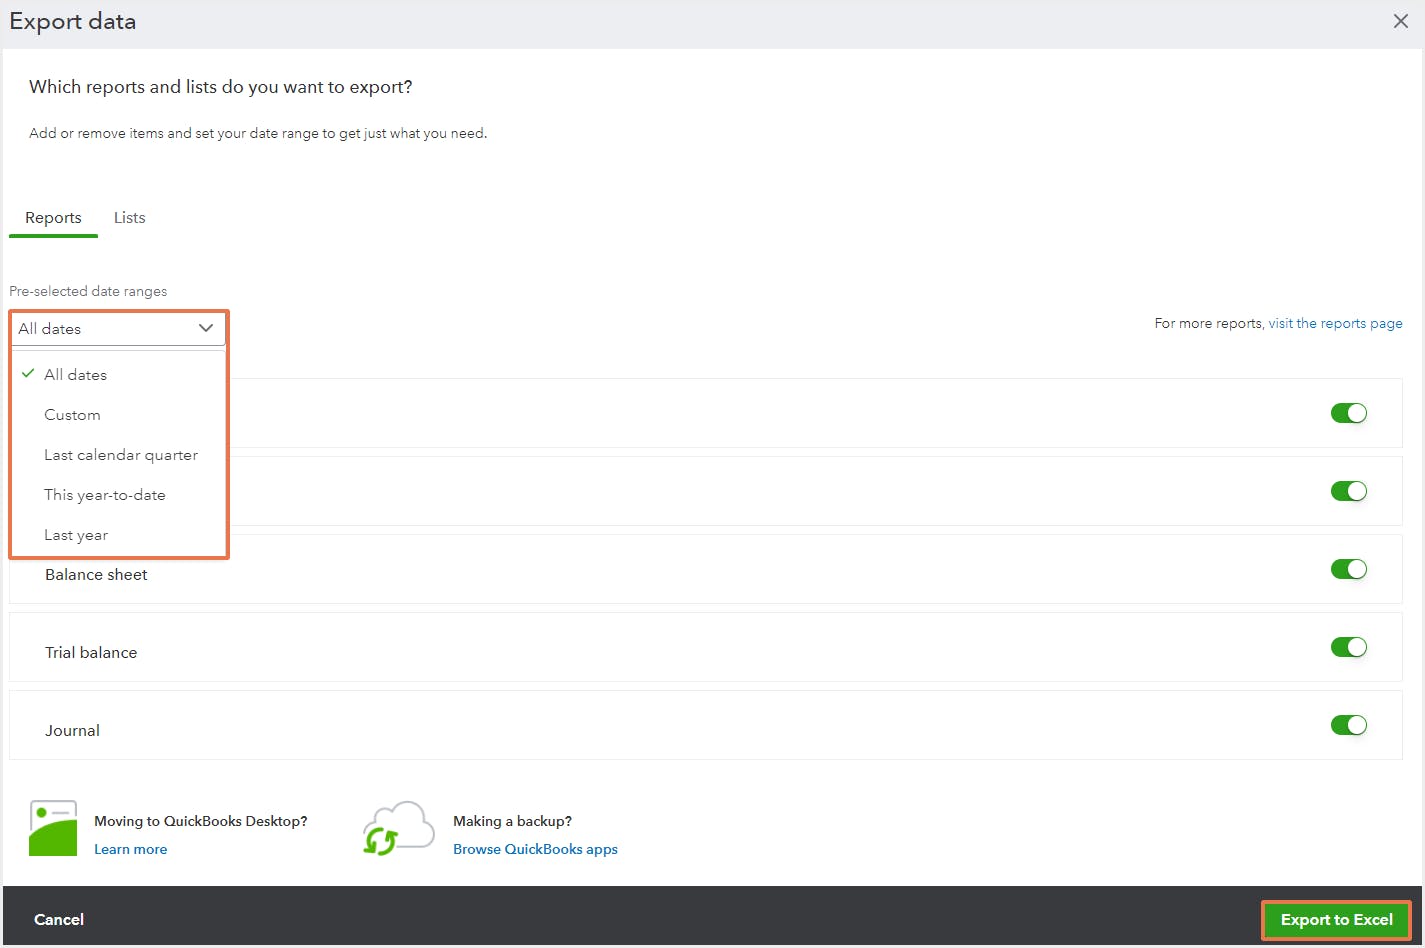
- Execute the Export: Locate the small icons at the top right of the report. Click the "Export" icon (usually represented by a small box with an arrow) and select "Export to Excel."
- Save and Open: The browser will prompt you to save the .xlsx file. Once saved, you can open it directly in Excel.
Exporting Lists (Customers, Vendors, Employees)
Sometimes you need more than just financial figures; you need the underlying database of contacts.
- Navigate to the specific menu (e.g., "Sales" then "Customers").
- Look for the "Export" icon near the "New Customer" button.
- Selecting this will download the entire list, including contact details, tax IDs, and current balances, into an Excel-friendly format.
Step-by-Step: Exporting from QuickBooks Desktop (QBD)
QuickBooks Desktop uses a more direct integration method. Because both applications often live on the same operating system, they "talk" to each other through the Windows registry.
The Report Center Method
- Open the Report: Go to the "Reports" menu and select the desired financial statement.
- Access the Excel Button: At the top of the report window, you will see a button labeled "Excel."
- Choose the Destination: Clicking this provides a dropdown menu. You can "Create New Worksheet" or "Update Existing Worksheet." The "Update" feature is particularly powerful for those who have pre-built Excel templates with formulas that rely on fresh data.
- Advanced Options: Within the export window, you can click "Advanced" to toggle settings like "Space between columns" or "Include QuickBooks Guide to Excel." It is generally recommended to uncheck the guide to keep your spreadsheet clean.
Exporting via CSV (Commas Separated Values)
If you encounter "Component Transfer" errors or if Excel fails to launch, exporting as a CSV is a reliable workaround. This method skips the direct integration and simply saves the data as raw text. You can then open Excel and use the "Data > From Text/CSV" feature to import the information. This is often the preferred method for very large datasets that might cause the standard export to freeze.
Advanced Data Extraction: Power Query and OData
For power users in 2026, the standard "Export to Excel" button is often just the beginning. To create truly dynamic reports that refresh automatically, one should utilize Excel Power Query.
Power Query allows you to connect Excel directly to your QuickBooks data source. For QuickBooks Online, this is often achieved through an OData (Open Data Protocol) connector or a third-party bridge. Instead of manually exporting a report every Monday morning, you can simply open your Excel workbook and click "Refresh All." Power Query will reach into QuickBooks, pull the latest transactions, apply your pre-defined cleaning steps (like removing headers or formatting dates), and populate your dashboard.
This method is superior for several reasons:
- Audit Trail: Every transformation step is recorded in Power Query.
- Speed: It bypasses the manual clicking and saving process.
- Consistency: It ensures that the data is formatted exactly the same way every time it is imported.
Troubleshooting Common Export Issues
Despite the maturity of these platforms, technical hurdles remain common. Below are the most frequent issues encountered during the export process.
The "Excel Could Not Be Started" Error
This is a classic QuickBooks Desktop issue. It usually occurs when QuickBooks is running as an Administrator but Excel is not (or vice versa). Both programs must have the same privilege level to communicate. Another common cause is a corrupted Office installation. Repairing Microsoft Office through the Windows Control Panel often resolves this.
Formatting Messes (Merged Cells and Blank Rows)
When QuickBooks exports a report, it tries to replicate the "look" of the report, including headers, footers, and subtotal lines. This often results in merged cells that make it impossible to sort or filter data in Excel.
- Solution: Use the "Collapse" feature in QuickBooks before exporting to remove unwanted detail, or use Excel’s "Find & Select > Go To Special > Blanks" to quickly identify and delete empty rows.
Disappearing Leading Zeros
QuickBooks often exports account numbers or zip codes as numbers. Excel, by default, removes leading zeros (e.g., "00123" becomes "123").
- Solution: When importing via CSV, ensure the column data format is set to "Text" rather than "General." If the export is already in Excel, you can use a custom number format (
00000) to restore the visual presence of the zeros.
Comparison of Export Methods
| Feature | QBO Export (Standard) | QBD Export (Standard) | Power Query / API |
|---|---|---|---|
| Ease of Use | Very High | High | Moderate/Advanced |
| Data Refresh | Manual Only | Manual (Update Existing) | Automatic (One-Click) |
| Speed | Fast for small reports | Fast for local files | Fastest for large data |
| Formatting | Minimal (Clean) | Heavy (Replicates UI) | Customizable |
| Customization | Low | Moderate | Unlimited |
Data Cleanup Post-Export: Making Information Actionable
Once the data is in Excel, the "practical" part of the guide begins. Raw data is rarely ready for a board presentation. Following these steps will ensure your data is "clean":
- Remove the "Header Slop": QuickBooks includes several rows at the top for the company name, report title, and date range. If you plan to use Pivot Tables, delete these rows so that your column headers (Date, Account, Amount) are in Row 1.
- Unmerge Cells: Select the entire sheet, right-click, and select "Format Cells." Under the Alignment tab, uncheck "Merge cells." This prevents errors when writing formulas.
- Convert to a Table: Select your data range and press
Ctrl + T. Converting your data into an official Excel Table enables "Structured References," which makes your formulas much easier to read and maintain. - Standardize Dates: Occasionally, QuickBooks dates export as text. Use the
VALUEfunction or the "Text to Columns" wizard to convert these back into serial dates that Excel can use for chronological sorting.
Security Considerations for Financial Data
In 2026, data breaches are a constant threat. When you export data from the secure, encrypted environment of QuickBooks into a local Excel file, you are creating a security vulnerability.
- Password Protection: If the spreadsheet contains sensitive payroll or profit data, go to "File > Info > Protect Workbook > Encrypt with Password."
- Local Storage vs. Cloud: Avoid saving exported financial data to unencrypted thumb drives. If using cloud storage like OneDrive or SharePoint, ensure that folder permissions are strictly audited.
- Data Minimization: Only export the columns you actually need. If you don't need social security numbers or private vendor addresses for your analysis, remove those columns before saving the final version of the spreadsheet.
Frequently Asked Questions
Can I export QuickBooks Desktop data to Excel without having Excel installed?
No, the direct export feature in QuickBooks Desktop requires a local installation of Microsoft Excel to function. However, you can choose to "Print" the report to a PDF or export it as a CSV (Comma Separated Values) file. A CSV file can be opened by any spreadsheet application, including Google Sheets or LibreOffice, without needing Microsoft Excel on your machine.
Why does my Profit and Loss look different in Excel than it does in QuickBooks?
This usually happens because of "collapsed" or "expanded" rows. If you export a report while certain sub-accounts are collapsed in QuickBooks, the Excel export may only show the parent account totals. Additionally, ensure that your "Accounting Method" (Accrual vs. Cash) is set correctly in QuickBooks before you hit the export button, as this significantly changes the data output.
Is there a limit to how many rows I can export from QuickBooks Online?
QuickBooks Online has practical limits based on the complexity of the report. Very large reports (e.g., a "General Ledger" for a company with 50,000 transactions) may time out or fail during the export process. In these cases, it is better to export the data in chunks—such as one month at a time—and then combine the sheets in Excel.
Can I automate the export process so it happens every night?
Direct automation of the "Export" button is not possible within the standard QuickBooks interface. To achieve this, you would need to use a third-party integration tool or an API-based connector like Power BI or Excel's Power Query. These tools can "pull" the data on a schedule without manual intervention.
Will exporting my data delete it from QuickBooks?
No. Exporting is a "read-only" action. It creates a copy of the data in an Excel format while leaving the original database in QuickBooks completely untouched. You can export the same report as many times as you like without any risk of data loss.
Final Recommendations for 2026
To master the process of exporting QuickBooks data to Excel, focus on data cleanliness at the source. The more work you do to filter and customize your report within QuickBooks, the less time you will spend formatting it in Excel. For those looking to elevate their financial reporting, the next logical step is moving beyond the "Export" button and learning to use Power Query. This transition transforms a manual, error-prone task into a streamlined, automated workflow, allowing you to spend less time moving data and more time analyzing what that data means for your business's future.
Image Gallery
Select an image to open it in a new tab.
Mateo Castillo
Decentralized Finance and E-Payments Strategist
