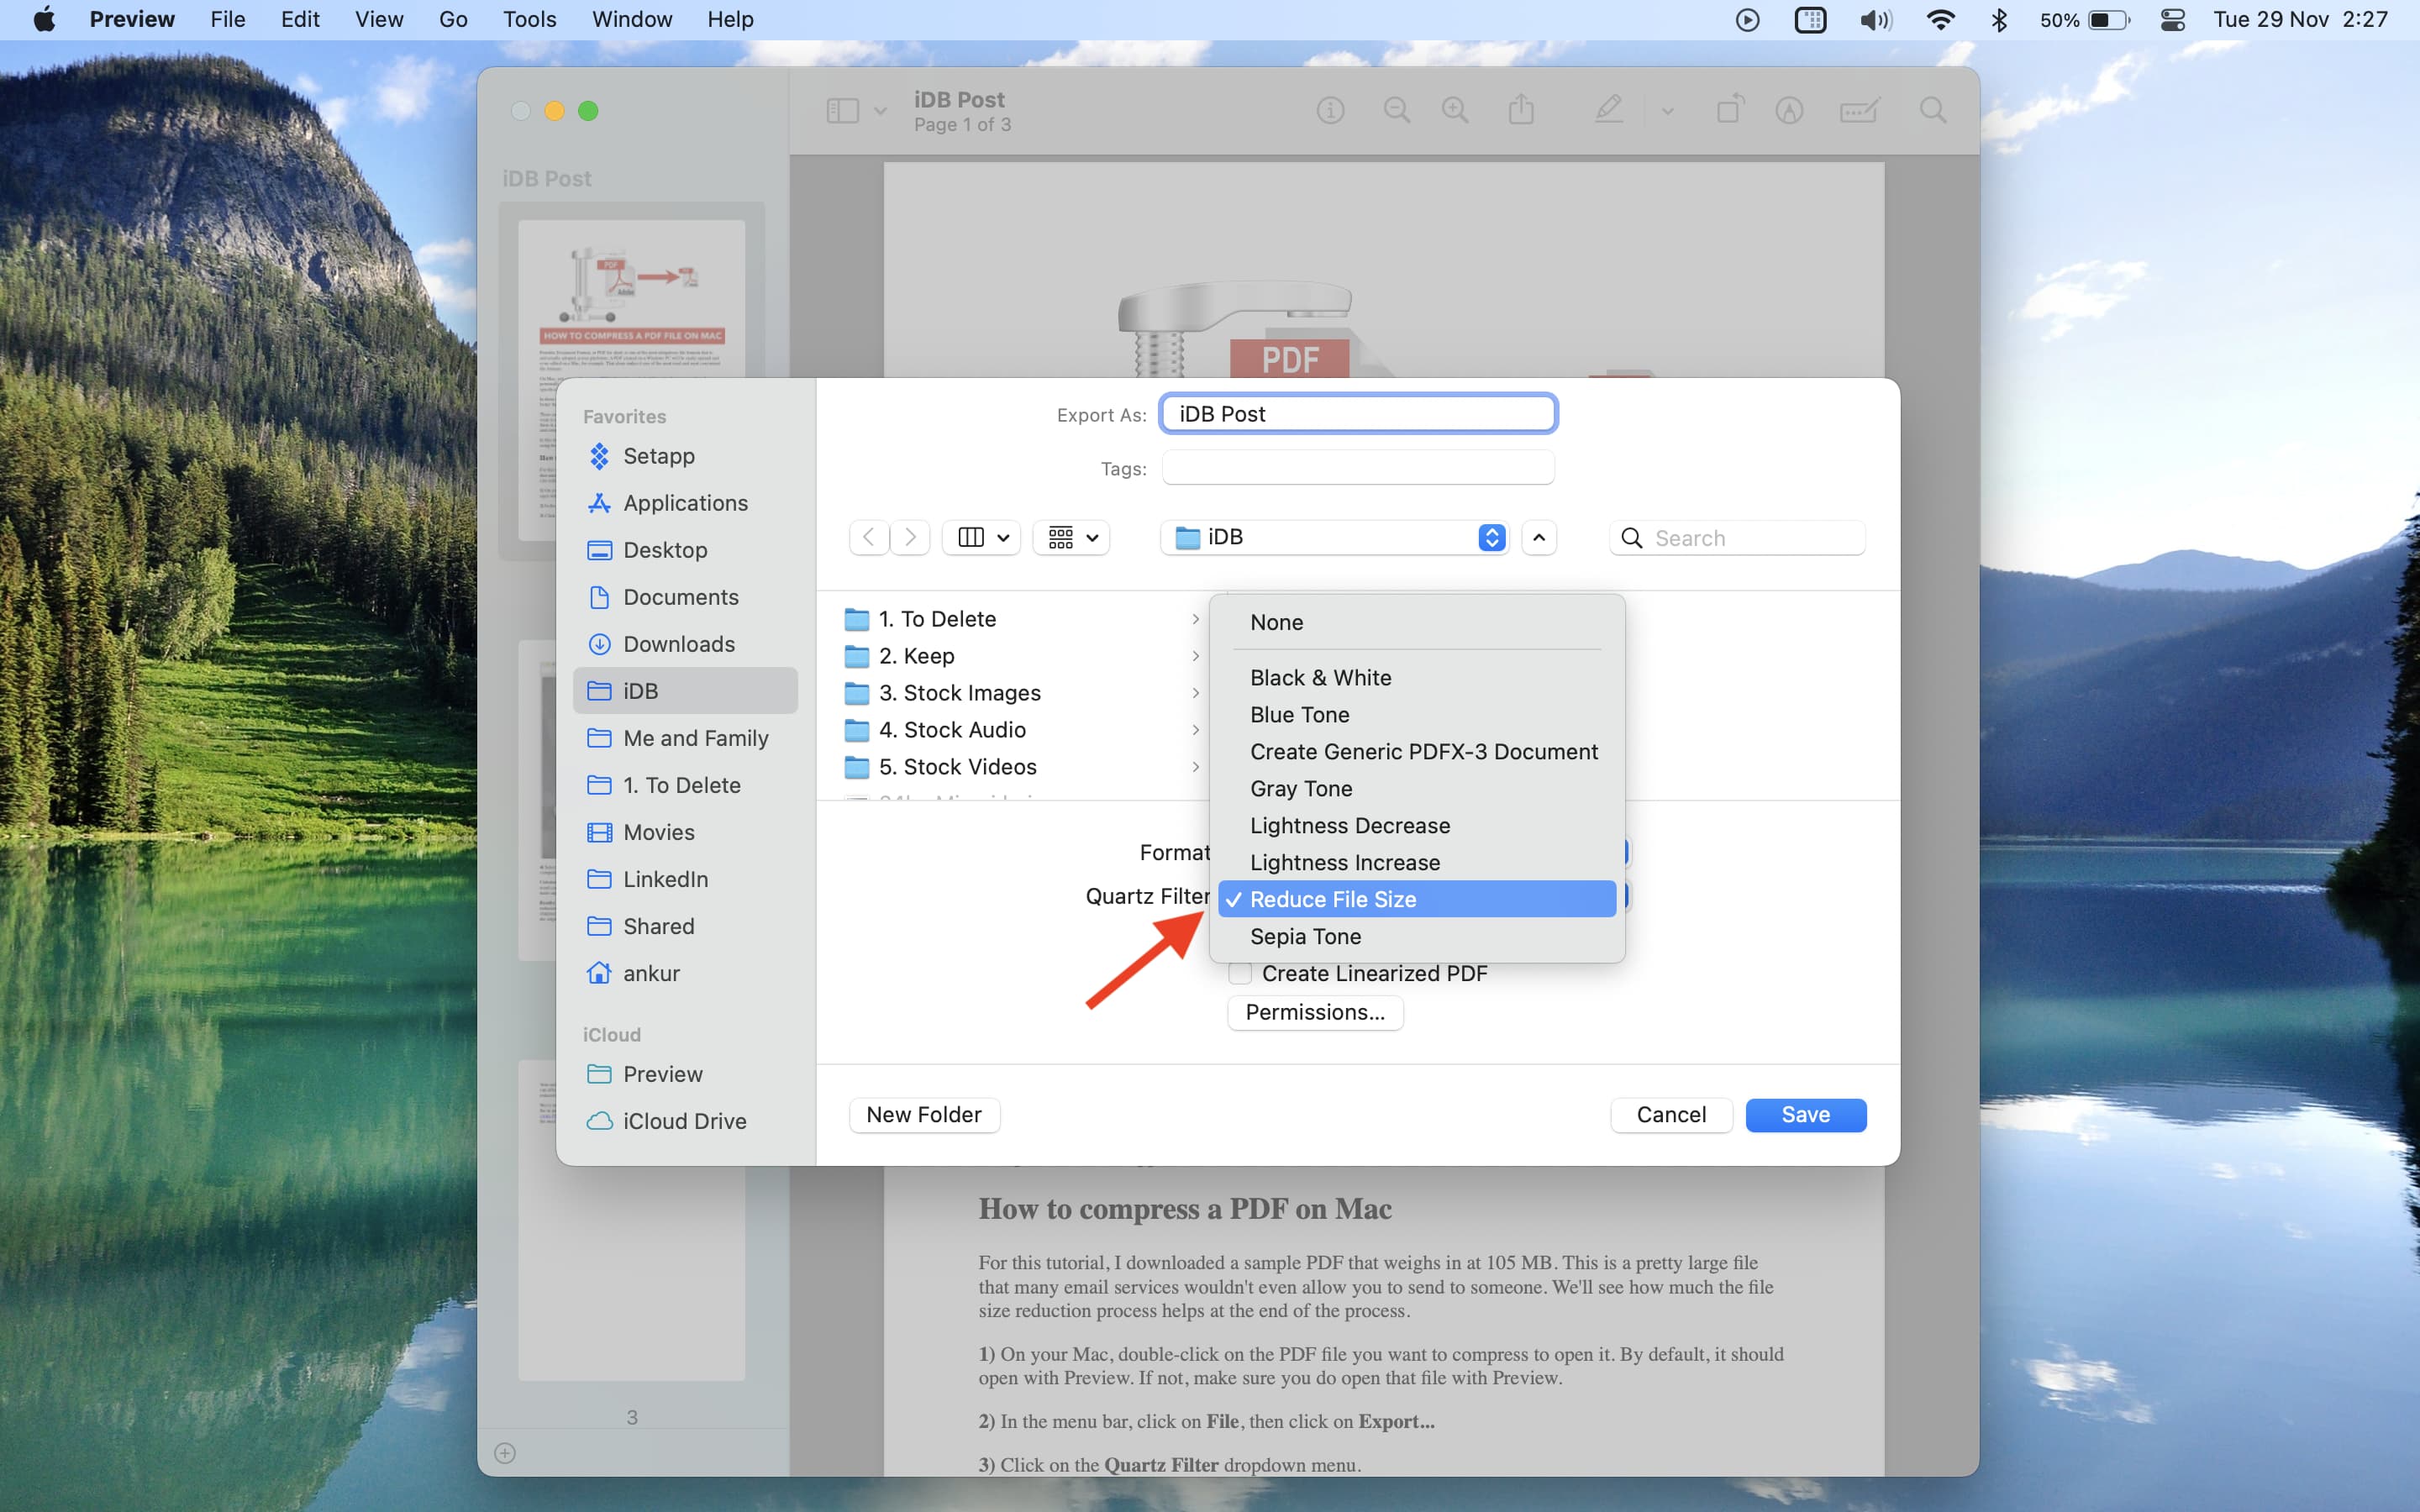
To reduce PDF file size on a Mac, open the document in the built-in Preview app, navigate to File > Export, and select Reduce File Size from the Quartz Filter dropdown menu. For more control over image quality and compression levels, you can use Finder Quick Actions, the ColorSync Utility, or professional third-party software like Adobe Acrobat.
Managing large PDF documents is a frequent challenge for Mac users, especially when faced with email attachment limits or web upload restrictions. While macOS provides several robust, built-in tools to handle this task without requiring additional software, the results can vary significantly based on the content of the document. High-resolution images, embedded fonts, and complex vector graphics all contribute to bloated file sizes. Understanding the mechanics of PDF compression on macOS allows you to strike the perfect balance between file portability and visual clarity.
Understanding PDF Bloat: Why Files Get Large
Before diving into the "how," it is helpful to understand the "why." A PDF (Portable Document Format) is essentially a container. It can hold text, vector paths, raster images, and metadata. Most often, the primary culprit for a large PDF is raster imagery. If a document contains several high-resolution photos scanned at 300 DPI (dots per inch) or higher, the file size will swell.
Other factors include:
- Embedded Fonts: To ensure a document looks the same on every device, PDFs often embed the entire character set of the fonts used.
- Metadata and Redundant Objects: Files that have been edited multiple times may contain "ghost" data or structural overhead that isn't visible but occupies space.
- Vector Complexity: Highly detailed architectural drawings or illustrations with thousands of individual paths can become computationally heavy and large in size.
In 2026, as high-definition displays become the standard, the temptation to keep everything at maximum resolution is high, but efficient document management requires intentional downsampling.
Method 1: Using the Preview App (The Standard Approach)
The Preview app is the default PDF viewer on macOS and remains the most accessible tool for file reduction. It utilizes the macOS "Quartz" engine to apply filters during the export process.
Step-by-Step Instructions
- Open the PDF: Double-click your PDF file to open it in Preview. If Preview isn't your default viewer, right-click the file and select Open With > Preview.
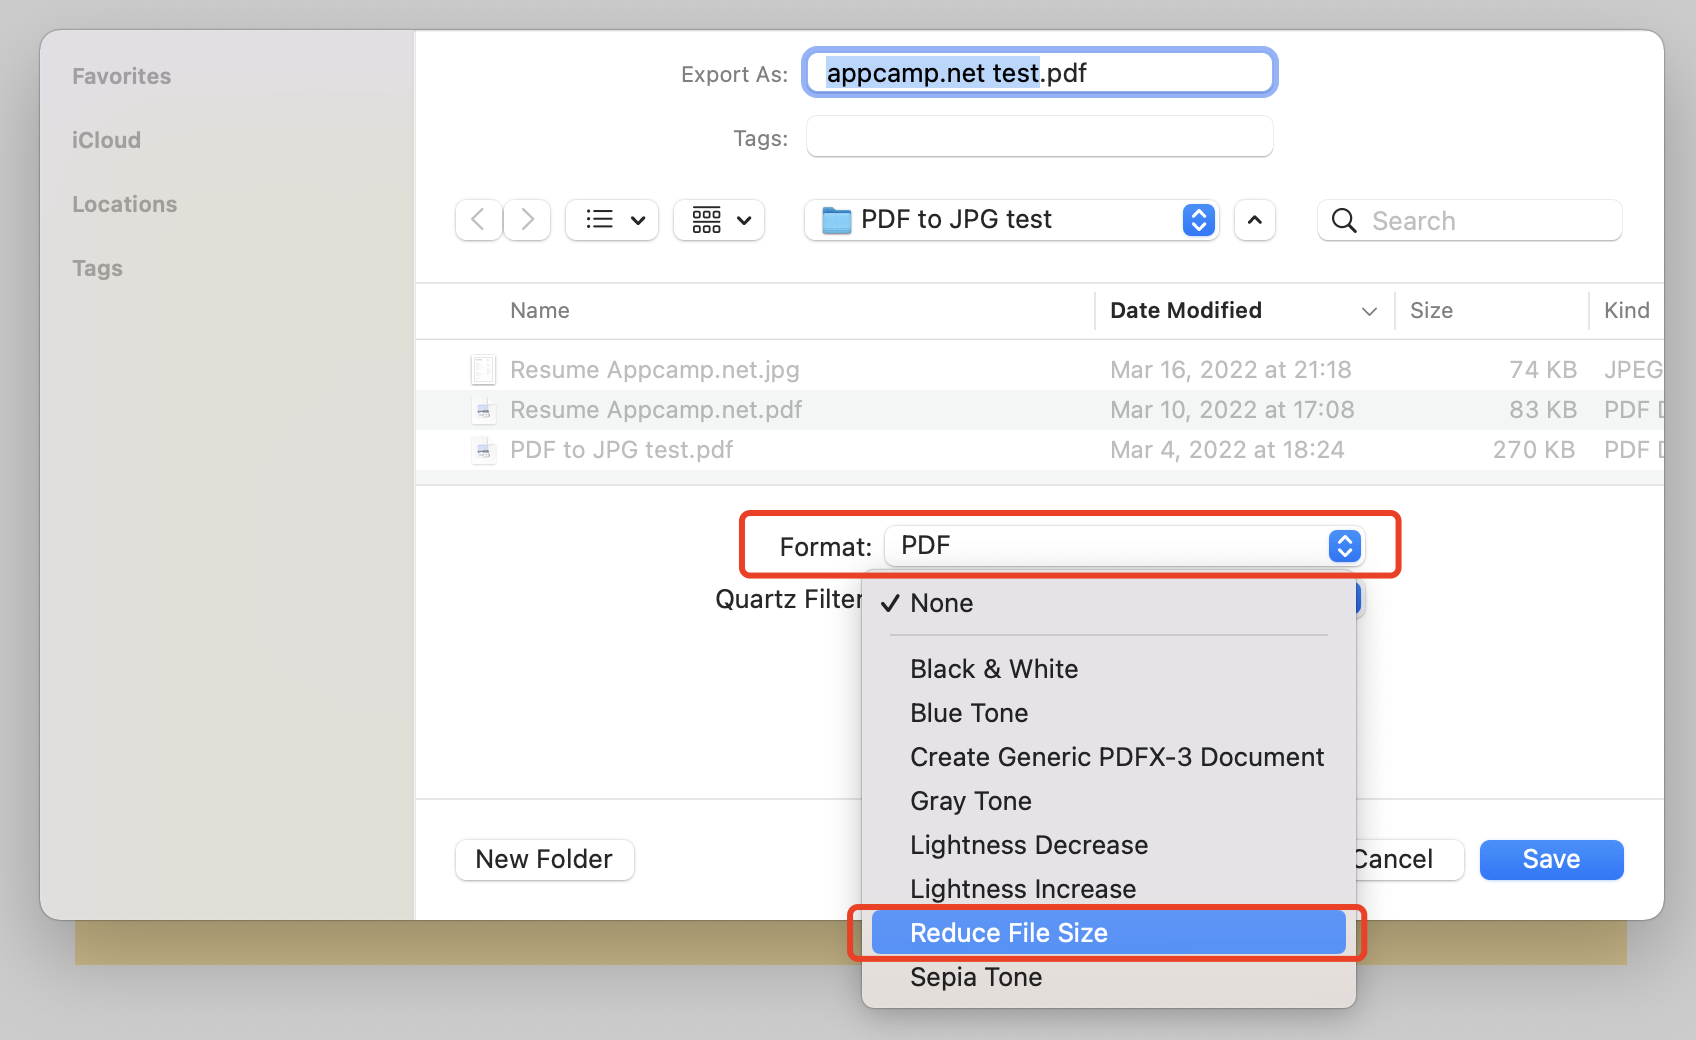
- Access the Export Menu: Go to the top menu bar and select File, then click Export... (Note: Do not select "Export as PDF" as it often lacks the filter options).
- Choose the Format: Ensure the Format dropdown is set to PDF.
- Apply the Quartz Filter: Click the Quartz Filter pop-up menu and select Reduce File Size.
- Save the File: Choose a destination and a new name (to avoid overwriting your high-quality original) and click Save.
The Limitations of the Default Filter
While this method is fast, the default "Reduce File Size" filter in Preview is often criticized for being too aggressive. It frequently applies heavy JPEG compression to images, which can result in a "blurry" or "pixelated" look. This is because the default system settings prioritize maximum space savings over legibility. For text-heavy documents, this is rarely an issue, but for portfolios or image-rich presentations, you may need a more nuanced approach.
Method 2: Customizing Compression with ColorSync Utility
For users who find the Preview default too blurry, the ColorSync Utility is a hidden gem in macOS that allows you to create custom compression profiles. This is the "pro" way to use native tools without buying expensive software.
Creating a Custom Filter
- Open ColorSync Utility: Press
Cmd + Spaceand type "ColorSync Utility," then hit Enter. - Navigate to Filters: Click on the Filters tab in the toolbar.
- Duplicate the Default: Find the "Reduce File Size" filter. Click the down arrow next to it and select Duplicate. This creates a copy you can safely edit.
- Rename your Filter: Click on the title of the copied filter (e.g., "Reduce File Size Copy") and name it something like "High Quality Compression."
- Adjust Image Sampling: Click the arrow to expand the Image Sampling settings. Here you can set a maximum scale or resolution. For example, setting the "Max" resolution to 150 DPI often provides a great balance for screen viewing.
- Adjust Image Compression: Expand the Image Compression section. Change the "Mode" to JPEG and adjust the "Quality" slider. Moving it to the middle or slightly to the right prevents the extreme blurriness found in the default filter.
- Use the Filter in Preview: Once saved, this custom filter will automatically appear in the Quartz Filter dropdown menu the next time you use the "Export" function in Preview.
Method 3: Finder Quick Actions (The Fastest Way)
Introduced in recent versions of macOS and fully matured by 2026, Quick Actions allow you to perform tasks directly from the Finder without even opening an app.
How to use Quick Actions for PDF
- Locate your PDF in any Finder window or on your Desktop.
- Right-click (or Control-click) the file.
- Scroll down to Quick Actions.
- Select Optimize PDF or Reduce File Size (the naming may vary slightly depending on your specific macOS configuration and installed services).
- Finder will create a compressed version of the file in the same folder, usually appended with a "compressed" suffix.
This method is ideal for bulk processing. You can highlight multiple PDF files, right-click, and apply the Quick Action to all of them simultaneously, saving significant time compared to opening each one in Preview.
Method 4: Professional Third-Party Software
If your workflow involves high-stakes document delivery (such as legal filings or commercial printing), native macOS tools might not offer enough granular control.
Adobe Acrobat Pro
Adobe Acrobat remains the industry standard. Its PDF Optimizer tool allows for:
- Audit Space Usage: See exactly which elements (fonts, images, forms) are taking up space.
- Downsampling Control: Specific DPI settings for color, grayscale, and monochrome images.
- Discarding Objects: Removing bookmarks, links, or form fields that are no longer needed.
- Flattening: Merging layers to reduce complexity.
PDF Expert by Readdle
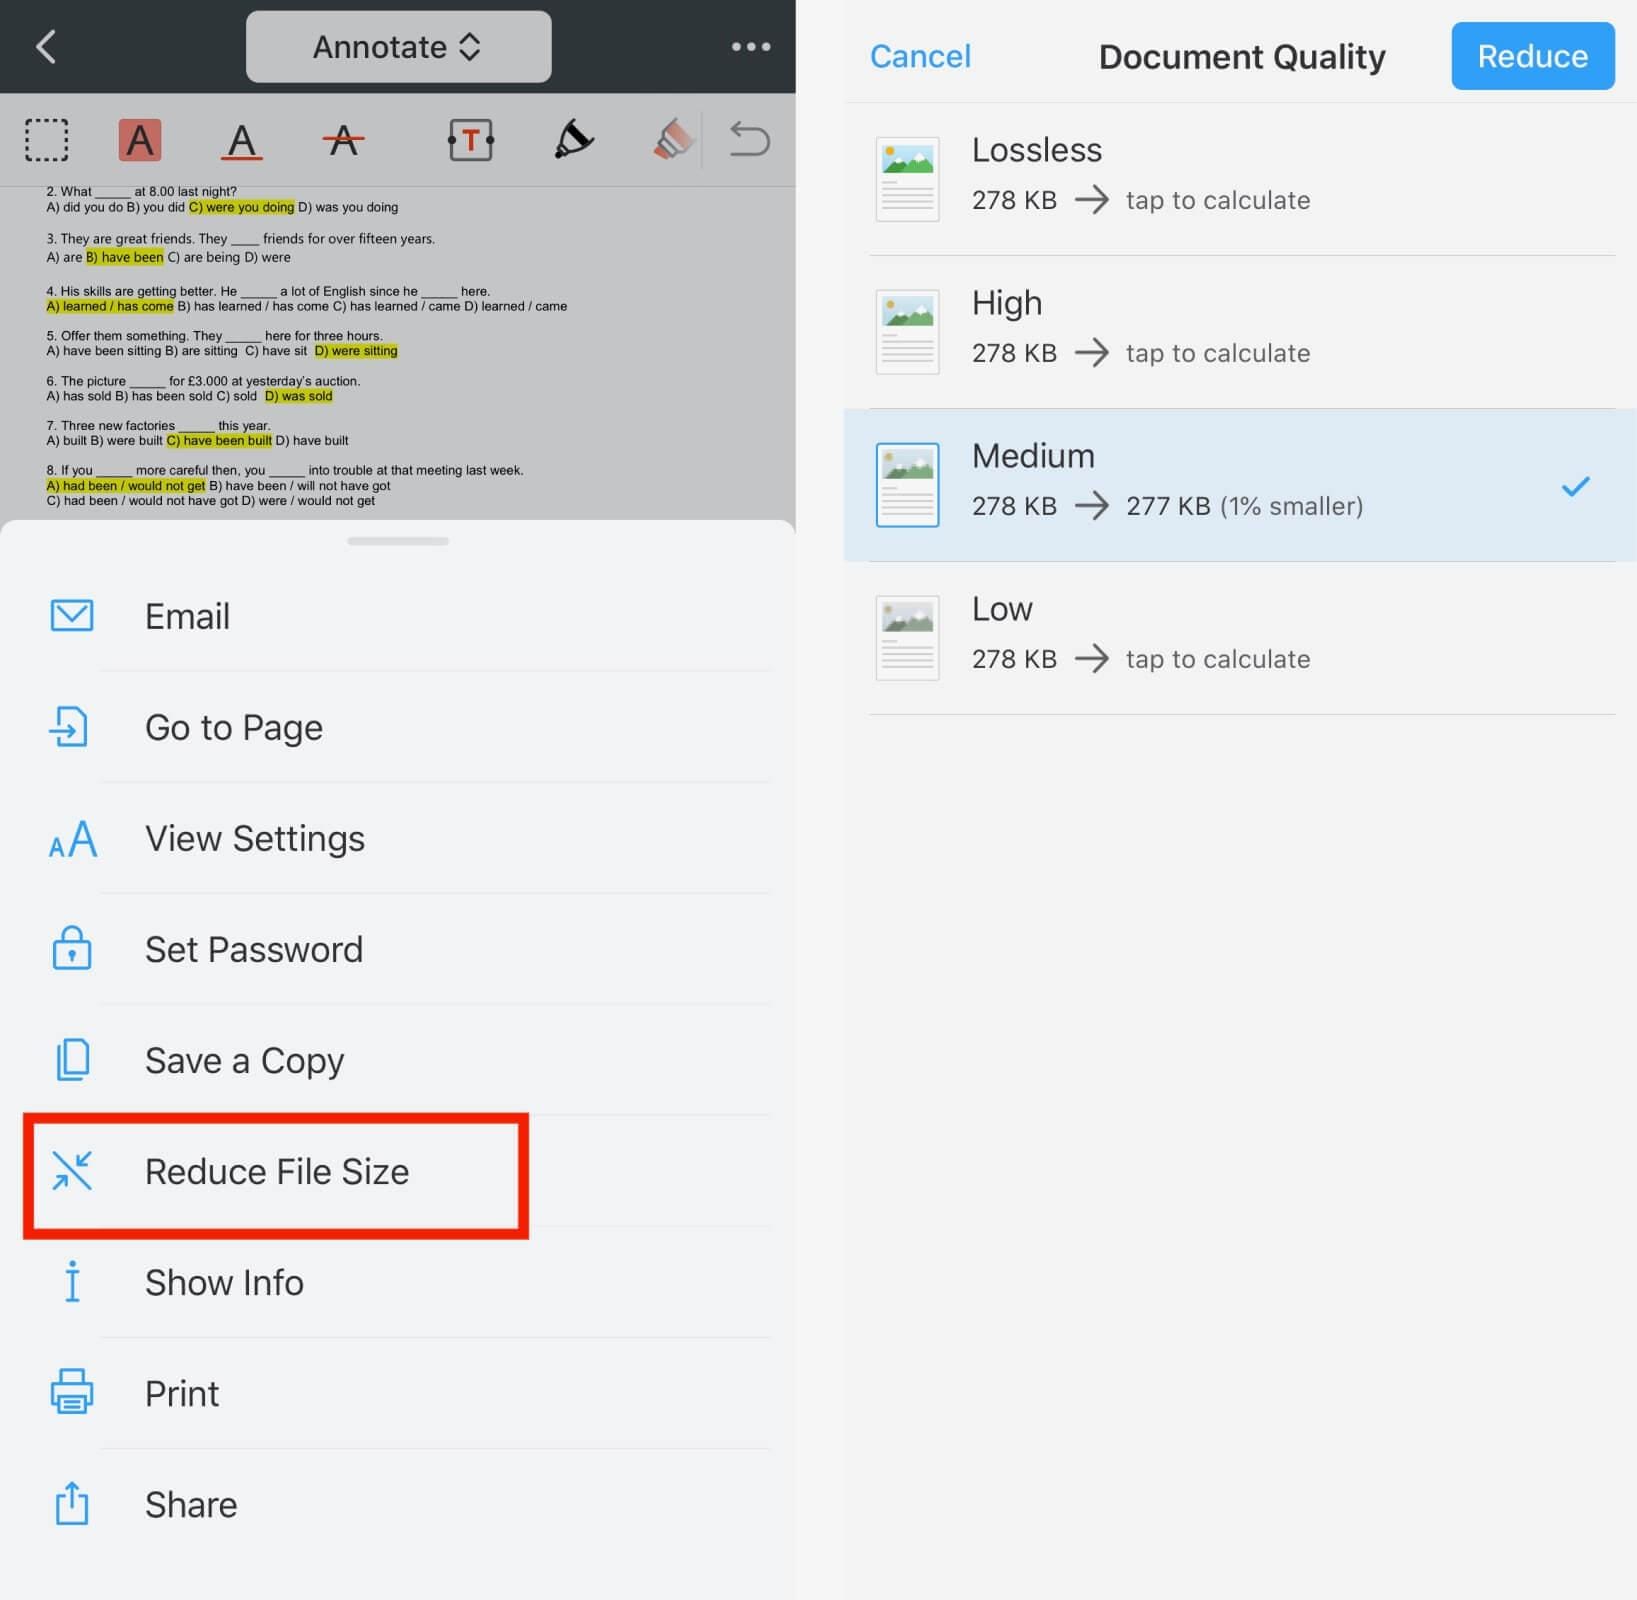
A popular Mac-native alternative to Adobe, PDF Expert offers a dedicated "Reduce File Size" feature with a simple slider. It provides a real-time preview of the resulting file size and allows you to choose between "Lossless" (removing redundant data) and "Lossy" (compressing images) options.
Comparison of PDF Reduction Methods on Mac
| Method | Ease of Use | Quality Control | Cost | Best For |
|---|---|---|---|---|
| Preview (Export) | High | Low | Free | Quick, one-off fixes for text documents. |
| ColorSync Utility | Medium | High | Free | Power users who want custom quality presets. |
| Finder Quick Actions | Very High | Low | Free | Bulk processing multiple files quickly. |
| Adobe Acrobat Pro | Medium | Very High | Subscription | Professional/Legal documents and print. |
| Online Converters | High | Medium | Free/Varies | One-off use if you aren't on your own Mac. |
Privacy and Security Considerations
When looking for ways to reduce PDF size, many users turn to web-based tools like Smallpdf or iLovePDF. While these services are convenient, they involve uploading your document to a third-party server.
Caution: If your PDF contains sensitive information—such as bank statements, medical records, or confidential business contracts—it is safer to use the native macOS tools described above. Processing files locally on your Mac ensures that your data never leaves your device, protecting you from potential data breaches or unauthorized access by third-party services.
Advanced Troubleshooting
Why is my PDF not getting smaller?
Sometimes, running a PDF through a "Reduce File Size" filter results in a file that is actually larger or remains the same size. This typically happens if:
- The file is already compressed: If the images were already optimized, re-compressing them might add overhead.
- Embedded Fonts: If a document has many unique fonts, the "Reduce File Size" filter (which mostly targets images) won't help much.
- Security Restrictions: Encrypted or password-protected PDFs often block compression algorithms from modifying the internal structure. You may need to remove the password before compressing.
Loss of Searchability
In some cases, aggressive compression can interfere with the Optical Character Recognition (OCR) layer of a scanned PDF. If the image quality drops too low, the text may no longer be selectable or searchable. Always verify that your document remains functional after compression.
Frequently Asked Questions
Can I reduce the size of a PDF without losing any quality?
Yes, this is known as "lossless" compression. You can achieve this by removing redundant metadata, discarding unused objects, or flattening layers. However, the size reduction is usually minimal (5-10%). To see significant reductions (50% or more), some "lossy" compression of images is almost always required.
How do I reduce the size of a scanned PDF?
Scanned PDFs are essentially large images wrapped in a PDF container. The best way to reduce their size is to use the ColorSync Utility method to downsample the images to 150 DPI or use a dedicated OCR tool that replaces heavy image data with lightweight text.
Is there a way to compress a PDF through the Terminal?
Yes. Advanced users can use Ghostscript, a command-line tool often installed via Homebrew. The command gs -sDEVICE=pdfwrite -dCompatibilityLevel=1.4 -dPDFSETTINGS=/screen -dNOPAUSE -dQUIET -dBATCH -sOutputFile=output.pdf input.pdf is a powerful way to shrink files using different "PDFSETTINGS" profiles like /screen, /ebook, or /printer.
Does reducing PDF size affect hyperlinks?
Generally, no. Standard compression filters target the image data and stream objects rather than the interactive elements like hyperlinks or bookmarks. However, if you use "Flattening" in professional tools, some interactive form fields may be converted into static text.
Why does the Preview "Reduce File Size" filter make images green or gray?
This is a known bug in older versions of the Quartz engine where color profiles were stripped incorrectly. In 2026, this is largely resolved, but if it occurs, using the ColorSync Utility to create a filter that "Matches to Color Profile" instead of just stripping it will fix the issue.
Final Recommendation
For the vast majority of Mac users, the most efficient workflow is to start with Finder Quick Actions. It is the fastest method and handles most standard documents well. If you find the resulting quality is too low, move to the ColorSync Utility to create a "Medium Quality" filter (e.g., 150 DPI, 70% JPEG quality). This provides a permanent, professional-grade solution built directly into your macOS system, eliminating the need for expensive subscriptions or risky online uploads.
For more detailed information on managing documents, you can visit the Official Apple Support page for Preview.
Image Gallery
Select an image to open it in a new tab.
Lars Thomsen
Global Labor Markets and Economic Strategy Editor
