Replacing a car starter is frequently described as an approachable DIY project because it typically involves basic hand tools, accessible component placement, and a straightforward electrical disconnect process compared to internal engine work. While vehicle configurations vary, the fundamental job usually requires removing a protective shield, disconnecting the battery, unbolting two or three mounting fasteners, and unplugging an electrical harness.
Understanding the Automotive Starter Motor System
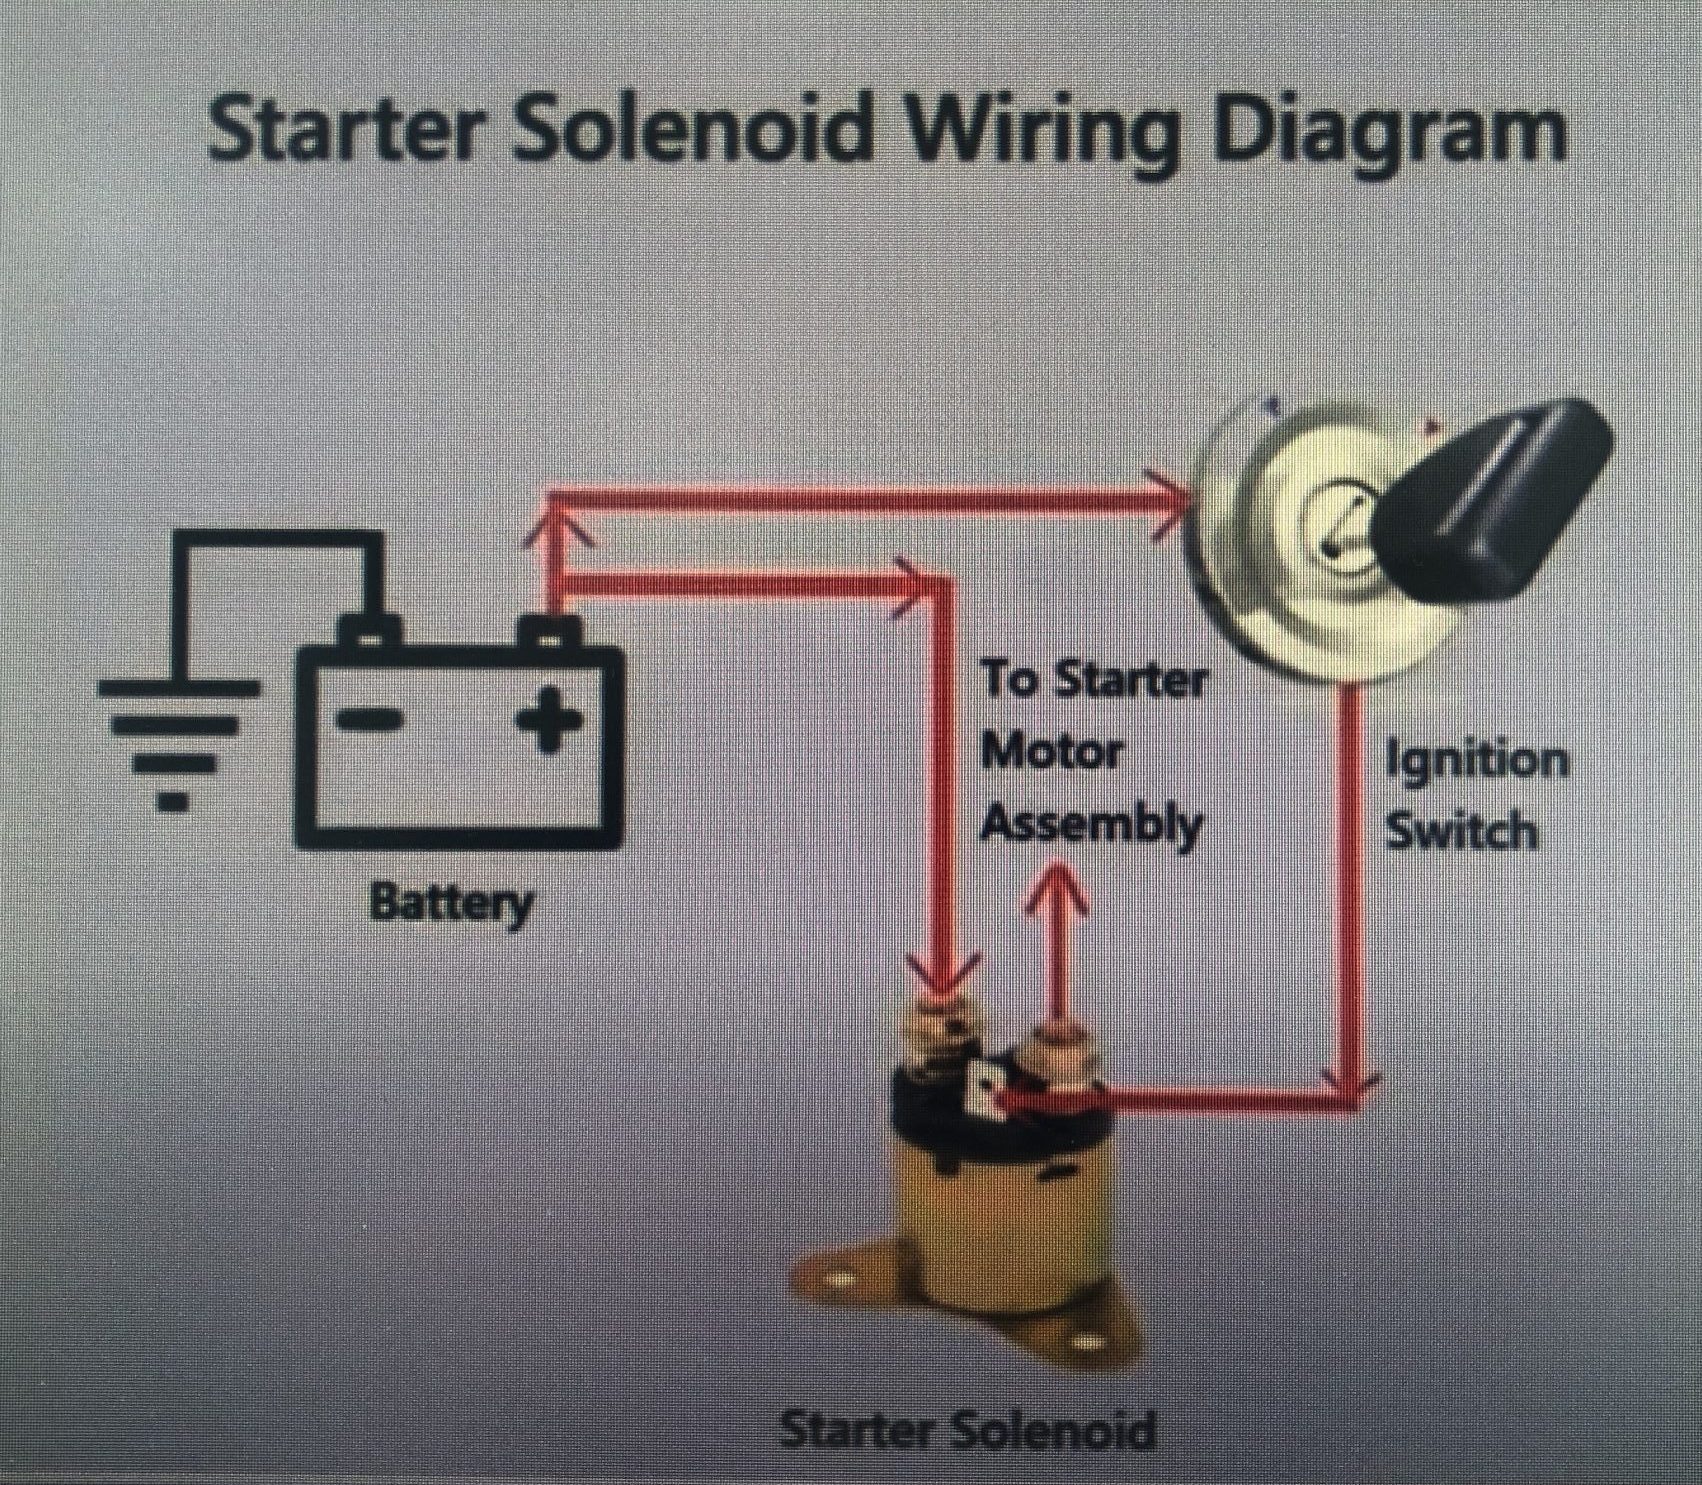
Before assessing the difficulty of replacing a starter, it helps to understand what the component does and why it occupies its specific physical location. The starter is a powerful electric motor driven by the vehicle's battery. When you turn the ignition key or press the start button, an electrical current flows through the ignition switch or starter relay to the starter solenoid. This solenoid acts as an electromagnetic switch that pushes the starter drive gear forward to engage the engine's flywheel ring gear while simultaneously closing high-current contacts to spin the motor, thereby cranking the internal combustion engine until it starts running under its own power.
Because the starter must physically interface with the engine's transmission or block to reach the flywheel, engineers must position it low down on the engine block, usually near the transmission bellhousing. This positioning dictates much of the physical labor involved in the swap. On many rear-wheel-drive trucks, older sedans, and certain transverse front-wheel-drive layouts, the starter sits out in the open, waiting just above the oil pan or beneath the intake manifold. When engineers leave plenty of surrounding clearance, the repair resembles little more than unbolting a heavy accessory. However, when packaging constraints force manufacturers to bury the starter beneath exhaust manifolds, intake plenums, or subframes, the simplicity of the task diminishes rapidly.
Evaluating the Difficulty: Why Many Mechanics Call It Beginner-Friendly
For millions of car owners, tackling a starter replacement serves as an introduction to intermediate automotive maintenance. Several structural and mechanical factors contribute to this reputation for accessibility.
Minimal Specialized Tool Requirements
Unlike internal engine rebuilds or modern transmission overhauls, swapping a starter generally does not require hydraulic presses, pullers, torque-angle gauges, or proprietary diagnostic scanners. A standard metric socket set featuring deep and shallow wells, a few socket extensions, a universal joint swivel, and a sturdy ratchet or breaker bar will usually suffice. Because the mounting bolts are selected by manufacturers to bear immense rotational torque and vibration, they are typically heavy-duty hex-head fasteners rather than fragile Torx or triple-square bolts that strip easily.
Clear Component Logic
The architecture of a starter replacement is binary: something is broken, and an identical new or remanufactured unit will take its place. There are no timing marks to align, no carburetors to jet, and no complex hydraulic lines to bleed. You remove the old unit, clean the mounting surface, and bolt the replacement unit back into the exact same orientation. This lack of calibration steps prevents the cascade of alignment errors common in timing belt or suspension overhauls.

Key Factors That Determine Real-World Difficulty
While the conceptual framework of replacing a starter is simple, real-world execution depends heavily on vehicle packaging. A job that takes twenty minutes on a vintage pickup truck can easily turn into a four-hour ordeal on a modern compact car or a luxury European sedan.
| Factor | "Easy" Scenario | "Difficult" Scenario |
|---|---|---|
| Engine Bay Clearance | Wide open, accessible from above | Cramped, buried under intake/exhaust |
| Access Angle | Direct line of sight from below | Requires extensions and swivels |
| Fastener Condition | Clean threads, accessible torque | Rusted, seized, or rounded heads |
| Associated Components | None to remove | Intake manifold or mount removal |
Under-Hood vs. Under-Car Access
The first variable is whether you can reach the starter from the top of the engine bay or whether you must hoist the vehicle. Front-wheel-drive configurations often tuck the starter against the firewall or beneath the exhaust manifold. Reaching these units safely requires a reliable floor jack, heavy-duty jack stands, and wheel chocks. If you lack a garage lift or safe jacking equipment, working on your back in a driveway introduces physical fatigue and safety considerations that increase perceived difficulty.
Peripheral Interference
On modern multi-valve engines, the intake plenum or exhaust heat shields frequently block direct access to the starter mounting bolts and electrical terminals. If you have to unbolt and move an intake manifold—complete with replacing fragile intake gaskets—the job ceases to be a simple starter swap and becomes an engine service. Similarly, severe rust on exhaust manifold studs can cause fasteners to snap, turning a straightforward unbolting procedure into a complex extraction task.
Essential Preparation and Safety Measures
Before reaching for a wrench, safety protocols must be established. Because the starter draws hundreds of amperes directly from the battery without going through a standard fuse, making a mistake with the electrical connections can cause severe electrical sparks, melted cables, or battery explosions.
- Disconnect the Battery Negative Terminal: This step is non-negotiable. Because the main power cable running to the starter solenoid is permanently live and un-fused, accidentally touching a metal wrench to the positive terminal while the battery is connected will cause an immediate, high-amperage short circuit.
- Secure the Vehicle: Never rely on a hydraulic floor jack to support a car while you work underneath it. Always transfer the vehicle's weight to certified jack stands rated for the vehicle's gross weight, and apply the emergency parking brake while blocking the rear wheels.
- Inspect Electrical Wiring: Take time to examine the fusible links, battery cables, and trigger wire connectors. Corrosion or oil saturation on the small spade connector often mimics a failed starter motor, meaning preparation and diagnosis can save you from replacing a part that is actually functional.
Step-by-Step Overview of the Replacement Process
While specific disassembly procedures vary by make and model, the general sequence of operations remains consistent across most automotive platforms.
Step 1: Power Isolation and Access
Disconnnect the negative battery terminal to eliminate electrical hazards. If the starter is bottom-mounted, raise the vehicle securely on jack stands and remove any plastic under-engine splash shields or metal skid plates that block your view of the starter housing.
Step 2: Disconnecting Electrical Terminals
Locate the starter solenoid. You will typically find two or three wires:
- A heavy-gauge battery cable secured with a nut.
- A smaller trigger wire (either a push-on spade connector or a smaller ring terminal secured with a nut).
Unscrew the retaining nuts carefully. If the plastic housing of the solenoid is aged and brittle, apply gentle counter-hold pressure to prevent cracking the internal switch assembly. Move the disconnected wires aside and tuck them away from metal chassis grounds.
Step 3: Removing Mounting Fasteners
Support the weight of the starter with one hand while loosening the long mounting bolts with your ratchet. Starters are heavier than they look—often weighing between 8 and 15 pounds—so letting one drop unexpectedly onto your face or chest while working underneath a car can result in injury. Once the bolts are free, maneuver the starter out of its mounting pocket, noting any alignment shims that may be tucked between the starter nose and the mounting pad.
Step 4: Installation and Verification
Compare the old starter side-by-side with the new unit to ensure the nose cone length, bolt hole spacing, and electrical terminal orientations match precisely. If shims were present on the old unit, reinstall them in the exact same positions to maintain proper gear mesh clearance with the flywheel. Bolt the new starter down to the manufacturer's specified torque rating, reattach the electrical cables snugly without over-tightening, reconnect the vehicle battery, and test-crank the engine.
Common Mistakes to Avoid During the Swap
Even experienced DIYers can encounter setbacks if they overlook specific details during a starter installation.
- Over-Tightening Terminals: The threaded studs on starter solenoids are often made of soft copper or brass. Applying excessive torque with a long ratchet will shear the stud or crack the solenoid housing, rendering a brand-new starter useless.
- Ignoring Corroded Cable Ends: Bolting a new starter to a corroded, green-fuzzed battery cable guarantees poor electrical performance. Clean the ring terminals with a wire brush until bright metal is visible before making the final connection.
- Dropping Alignment Shims: Some General Motors and Ford vehicles use thin steel shims between the starter and the engine block to achieve proper gear clearance. Failing to transfer these shims can cause a loud grinding noise when starting the car, leading to premature wear on the starter drive gear and the flywheel ring gear.
Frequently Asked Questions
Do I always need to disconnect the battery before changing a starter?
Yes. The thick cable running from the battery positive terminal to the starter solenoid carries continuous, unfused power. Leaving the battery connected while removing this cable creates an extreme risk of severe electrical arcing, component damage, and burns.
What are the primary signs that a starter is failing?
Common indicators include a single loud click when turning the key without the engine cranking, a slow or sluggish cranking sound, intermittent starting where the vehicle only starts after multiple attempts, or a whirring noise where the starter motor spins independently of the engine flywheel.
Can a bad starter drain a car battery overnight?
While standard starter failures usually involve internal open circuits or worn brushes that prevent current flow, a shorted solenoid winding or a stuck starter relay can cause the starter to stay engaged continuously, rapidly draining the battery and creating a severe fire hazard.
How long does it usually take to replace a starter?
For an open-access engine bay, a DIYer can often complete the swap in 45 minutes to 1.5 hours. Vehicles with complex packaging that require removing intake plenums or exhaust components can extend the installation time to 3 to 5 hours.
Are remanufactured starters reliable?
Remanufactured starters are widely used and reliable, provided they come from reputable suppliers or factory rebuild programs. They typically involve replacing worn brushes, bearings, and solenoids while retaining the original durable cast housing.
Conclusion
Replacing a starter motor is considered an easy and approachable project primarily because it requires standard hand tools, logical mechanical steps, and zero internal engine calibration. While tight under-hood clearances and stubborn, rusted bolts can occasionally transform a straightforward swap into an afternoon project, the fundamental task remains well within the reach of anyone willing to follow safety precautions, properly support their vehicle, and manage electrical components with care. Taking the time to verify battery condition and clean cable connections ensures the repair holds up reliably for years of daily driving.
Image Gallery
Select an image to open it in a new tab.
Zara El-Hashem
Sociocultural Dynamics and Academics Writer
