
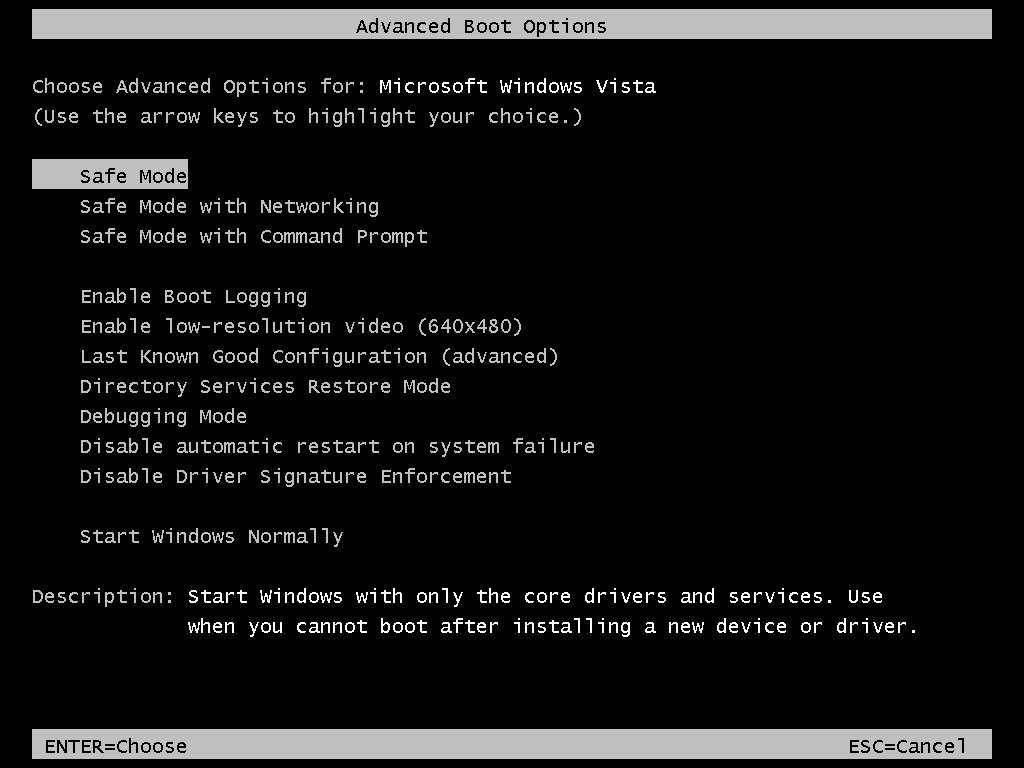
To recover Windows 7 after a crash, you should first attempt to access the Advanced Boot Options menu by pressing F8 during startup. From there, you can select "Startup Repair" to fix system files, "Safe Mode" to troubleshoot drivers, or "Last Known Good Configuration" to revert recent registry changes.
Even in 2026, Windows 7 remains a fixture in specific environments, such as legacy industrial control systems, specialized laboratory software, and among enthusiasts maintaining period-accurate hardware. However, because the operating system is well past its end-of-life (EOL) date, a system crash can be particularly stressful, as official Microsoft support is no longer available. When a Windows 7 machine fails to boot or encounters the dreaded "Blue Screen of Death" (BSOD), the recovery process relies on built-in tools designed decades ago.
Understanding the root cause of a crash is the first step toward a successful recovery. Crashes generally fall into two categories: software-related (corrupted drivers, registry errors, or file system damage) and hardware-related (failing hard drives, overheating, or faulty RAM). The following five methods provide a structured hierarchy for restoring your system, starting from the least intrusive to the most comprehensive.
1. Using Startup Repair from the Advanced Boot Options
The Startup Repair tool is the most common first response to a Windows 7 crash. It is an automated utility designed to find and fix common issues that prevent the operating system from booting correctly, such as missing or damaged system files, corrupted boot configuration data (BCD), or invalid partition table entries.
How to Access Startup Repair
To launch this tool, restart your computer and repeatedly tap the F8 key before the Windows logo appears. This action triggers the Advanced Boot Options menu. Select "Repair Your Computer" and press Enter. After choosing your keyboard layout, the System Recovery Options window will appear. Select "Startup Repair" from the list.
What Happens During the Repair
Startup Repair performs a series of diagnostic tests. It checks for disk metadata integrity, verifies that the primary system files are present, and ensures the registry hives are loadable. If it finds a problem, it will attempt to fix it automatically. For example, if your Master Boot Record (MBR) is corrupted, the tool will rewrite the code necessary to hand off the boot process to the operating system.
When Startup Repair Fails
If Startup Repair cannot fix the problem, it often provides a link to view "diagnostic and repair details." Clicking this reveals a log file (often located at C:\Windows\System32\Logfiles\Srt\SrtTrail.txt). In a 2026 context, reviewing this log is essential because it can identify if the crash is due to an aging hard drive (indicated by disk read errors) rather than a simple software glitch.
2. Booting into Safe Mode for Driver and Software Troubleshooting
If Windows 7 starts to load but crashes mid-way or freezes immediately after login, the culprit is likely a driver or a third-party service. Safe Mode is a diagnostic environment that loads only the essential drivers and services required to run the Windows kernel.
The Three Variants of Safe Mode
When you access the F8 menu, you are presented with three versions of Safe Mode:
- Safe Mode: The standard version with a minimal interface and no network access.
- Safe Mode with Networking: Includes the network drivers needed to access the internet or local network (useful for downloading drivers).
- Safe Mode with Command Prompt: Loads the command line interface instead of the Windows GUI (for advanced users).
Troubleshooting Steps in Safe Mode
Once in Safe Mode, you should navigate to the Device Manager. Look for any devices marked with a yellow exclamation point, which indicates a driver conflict. Right-clicking these and selecting "Uninstall" can often resolve a crash caused by a recent update or a corrupted peripheral driver. Additionally, you can use the Programs and Features applet in the Control Panel to remove software installed immediately before the crashes began.
Safe Mode also allows you to run the System File Checker (SFC). Open the Command Prompt as an administrator and type sfc /scannow. This utility compares your system files against a cached "known-good" version and replaces any that are missing or modified.

3. Reverting with Last Known Good Configuration (Advanced)
Windows 7 maintains a backup of the registry settings and driver configurations that were in place the last time the system successfully booted to the desktop. This feature, known as "Last Known Good Configuration," is a surgical tool specifically meant for issues caused by registry changes or driver installations that occurred during the most recent session.
Why This Method is Unique
Unlike System Restore, which can change files and uninstall applications, Last Known Good Configuration only targets the HKEY_LOCAL_MACHINE\SYSTEM\CurrentControlSet registry key. This key contains the configuration for all hardware drivers and system services. If a new driver has rendered the system unbootable, this method discards the new, faulty configuration and restores the previous, working one.
How to Apply It
Restart the machine and tap F8 to reach the Advanced Boot Options. Select "Last Known Good Configuration (advanced)" and press Enter. This is often the fastest way to recover from a "stop error" or BSOD that appeared immediately after you installed a new piece of hardware or adjusted a system-level setting. Note that if you have already managed to log in once after the crash, the "Last Known Good" version may have already been overwritten by the faulty session, rendering this method ineffective.
4. Utilizing System Restore to Roll Back Changes
If the previous methods fail, System Restore is the next logical step. This tool "rolls back" the system files, registry keys, and installed programs to a previous point in time, known as a Restore Point.
Understanding Restore Points
Windows 7 creates restore points automatically before significant events, such as the installation of a new program or a Windows Update (though updates for Win 7 ended years ago, manual installations still trigger them). You can also create these points manually. Crucially, System Restore does not affect your personal files, such as documents, photos, or emails.
Performing a Restore from the Recovery Menu
If you cannot reach the desktop, you can access System Restore from the System Recovery Options (the same menu where Startup Repair is located).
- Select System Restore.
- Choose a restore point that predates the crash.
- Confirm the action and allow the system to restart.
In 2026, many Windows 7 systems are running on older mechanical hard drives. If System Restore takes an unusually long time (several hours) or results in an error like 0x80070005, it is a strong indication that the drive has developed bad sectors where the restore point data was stored.
5. System Image Recovery or Manual BCD Rebuild
The final and most comprehensive recovery method involves using a System Image backup or manually repairing the boot sector via the Command Prompt. This is necessary when the operating system's foundation is so damaged that automated tools cannot recognize the Windows installation.
System Image Recovery
If you previously created a System Image using the "Backup and Restore" tool in Windows 7, you can restore your entire computer—including all programs, files, and settings—to a new or formatted hard drive. To do this, select "System Image Recovery" from the System Recovery Options menu and connect the external drive containing your backup. This is the "nuclear option" that guarantees a return to a working state, provided you have a recent image.
Manual Bootrec Commands
If you do not have an image, you can attempt to manually rebuild the boot environment using the Command Prompt. From the recovery menu, open the Command Prompt and enter the following commands one by one:
bootrec /fixmbr– Writes a new Master Boot Record.bootrec /fixboot– Writes a new boot sector to the system partition.bootrec /rebuildbcd– Scans for Windows installations and lets you add them back to the boot configuration data.
These commands are often the only way to fix a "BOOTMGR is missing" error, which frequently occurs after a sudden power loss or a failed partition resize.
Comparison of Recovery Methods
The following table summarizes the primary recovery methods for Windows 7 to help you decide which path to take based on your specific situation.
| Recovery Method | Primary Use Case | Difficulty Level | Data Risk |
|---|---|---|---|
| Startup Repair | Automated fix for boot errors | Low | Very Low |
| Safe Mode | Driver/Software troubleshooting | Medium | Low |
| Last Known Good | Reverting recent registry/driver changes | Low | Low |
| System Restore | Rolling back system to an earlier date | Medium | Low (System files only) |
| System Image | Total system failure or HDD replacement | High | High (Overwrites current data) |
| Command Prompt | Manual MBR/BCD repair (Expert) | High | Medium |
Frequently Asked Questions
Can I recover Windows 7 if I don't have the original installation disc?
Yes. Most Windows 7 computers come with a pre-installed recovery partition. You can usually access this by pressing a specific key (like F11 or F12, depending on the manufacturer) during startup. Additionally, the F8 menu provides access to the "Repair Your Computer" options, which are stored on the hard drive itself, eliminating the need for physical media in many cases.
What should I do if the F8 key doesn't bring up the menu?
If the F8 key fails, it may be because your computer uses a modern UEFI BIOS that initializes too quickly, or your keyboard isn't recognized during the early boot phase. Try using a wired USB keyboard instead of a wireless one. If the system still won't trigger the menu, you may need to boot from a Windows 7 Recovery USB or DVD to access the repair tools.
Will these recovery methods delete my photos and documents?
Startup Repair, Safe Mode, Last Known Good Configuration, and System Restore are designed to leave your personal files (documents, images, videos) untouched. However, System Image Recovery will overwrite everything on the destination drive with the data from the backup. If you are performing a manual reinstallation of the OS, your files will be lost unless you have backed them up or moved them to a separate partition.
How do I fix a "Blue Screen of Death" (BSOD) that keeps happening?
A recurring BSOD usually points to a specific driver or hardware failure. In Safe Mode, you should disable "Automatic Restart" (Control Panel > System > Advanced System Settings > Startup and Recovery) so you can read the error code. Search for the specific code (e.g., 0x0000007B or 0x0000003B) to identify the failing component. In 2026, these codes often point to failing capacitors on old motherboards or degraded power supplies.
Is it safe to continue using Windows 7 in 2026 after recovering it?
While Windows 7 can be recovered, it is important to remember that it no longer receives security updates. If you must use it for legacy software, ensure the machine is disconnected from the internet or sits behind a very robust hardware firewall. A system crash can sometimes be caused by malware that exploits the unpatched vulnerabilities of the OS.
Practical Recommendation
If you successfully recover your Windows 7 system, your first action should be to perform a hardware health check. Use a utility to check the S.M.A.R.T. status of your hard drive and run a memory diagnostic (found in the System Recovery Options menu). Because these machines are aging, a crash is often a warning sign of imminent hardware failure. Once the system is stable, immediately create a System Image on an external drive. This ensures that if the hardware fails completely, you can migrate your specialized environment to a new drive or a virtual machine without losing your configuration.
Image Gallery
Select an image to open it in a new tab.


Vivian Cho
Executive IT and Emerging Technologies Reporter
