Inserting a checkbox in Microsoft Excel 2016 allows you to transform static lists into interactive, functional checklists that update your data visualization or task management workflows. To achieve this, you must enable the "Developer" tab in your ribbon, navigate to the "Controls" group, select the checkbox icon, and draw it directly onto your worksheet grid.
Understanding the Developer Tab in Excel 2016
The primary obstacle most users encounter when attempting to add interactive elements like checkboxes in Excel 2016 is that the necessary tools are hidden by default. Microsoft classifies checkboxes as "Form Controls," which are housed within the Developer tab. This tab is designed for advanced users, macro developers, and those who require custom interface elements, which explains why it is not pinned to the main ribbon upon installation.
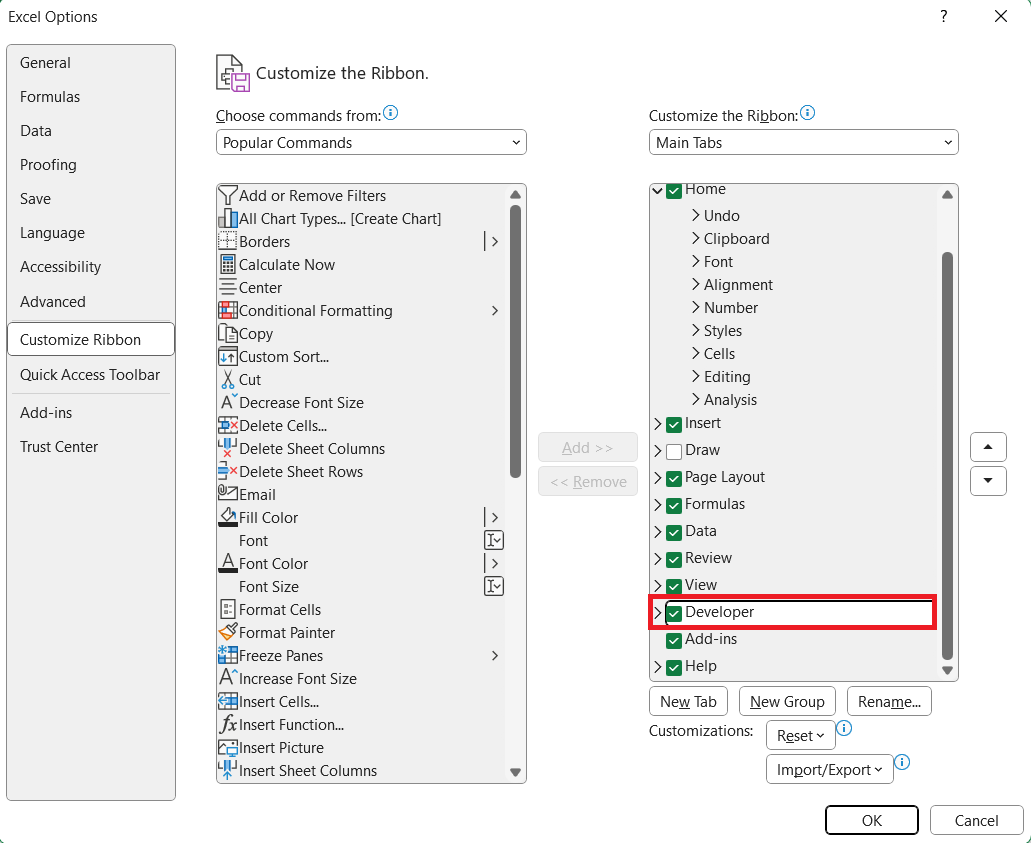
To begin the process, you must manually display this tab. Follow these steps to unlock the Developer environment:
- Open your Excel 2016 workbook.
- Right-click anywhere on the existing ribbon at the top of the interface.
- Select "Customize the Ribbon" from the context menu that appears.
- In the "Excel Options" dialog box, look at the right-hand column titled "Customize the Ribbon."
- Locate the "Developer" checkbox in the list of main tabs. Ensure it is ticked.
- Click "OK" to apply these changes.
Once you have completed this, you will see a new tab labeled "Developer" appear between the "View" and "Help" (or "Add-ins") tabs on your ribbon. This tab is your gateway to various interactive controls, including radio buttons, list boxes, and the checkbox itself.
Placing the Checkbox onto Your Worksheet
Now that you have access to the Developer tab, the actual insertion process is straightforward. However, achieving a clean, professional look requires attention to detail.
- Navigate to the Developer tab you just enabled.
- Within the "Controls" group, click the Insert button.
- A drop-down menu will open, categorized by "Form Controls" and "ActiveX Controls."
- Select the icon labeled "Check Box (Form Control)"—it typically looks like a small square with a checkmark inside.
- Once selected, your mouse cursor will transform into a crosshair icon.
- Click and drag on the cell where you want the checkbox to appear.
The checkbox will appear with default text, such as "Check Box 1." To edit this text, simply right-click the checkbox and select "Edit Text." You can then delete the default label or rename it to suit your project requirements, such as "Complete," "Pending," or "Verified."
Managing Checkbox Properties and Linking Cells
Simply placing a visual box on the screen does not inherently change your data. To make your checklist functional—for example, to trigger a "TRUE" or "FALSE" value when the box is clicked—you must link the checkbox to a specific cell.
- Right-click the checkbox you created.
- Select Format Control from the menu.
- In the dialog box, ensure the Control tab is active.
- In the Cell link field, type the address of the cell you want to associate with this checkbox (e.g.,
$B$2). - Click "OK."
Now, when you click the checkbox in your sheet, the linked cell will update its value automatically to "TRUE" when checked and "FALSE" when unchecked. This functionality is essential for creating dynamic formulas, such as IF statements or conditional formatting rules that change the color of a row once a task is marked complete.
Designing Functional Checklists: A Comparison of Options
When working in Excel 2016, you have two primary ways to create interactive lists. Understanding the difference is vital for maintaining workbook stability.
| Feature | Form Control Checkbox | ActiveX Control Checkbox |
|---|---|---|
| Ease of Use | Simple, robust, and stable. | More complex; requires VBA. |
| Compatibility | High; standard across all versions. | Lower; can be finicky in older files. |
| Customization | Limited to size and text. | Extensive (font, color, behavior). |
| Best Use Case | Basic checklists and trackers. | Specialized automated dashboards. |
For the vast majority of users, the Form Control checkbox is the superior choice for Excel 2016. It is lightweight, less prone to macro-related security errors, and functions reliably across different operating systems.
Applying Conditional Formatting Based on Checkboxes
The true power of an Excel checkbox is realized when you integrate it with Conditional Formatting. This allows your worksheet to visually highlight completed items automatically.
- Select the range of cells you wish to format (e.g., your task description cells).
- Go to the Home tab and select Conditional Formatting.
- Choose New Rule, then select Use a formula to determine which cells to format.
- In the formula box, enter a condition pointing to your linked cell, such as
=$B$2=TRUE. - Click the Format button, select the "Fill" or "Font" tab, and choose your preferred visual style (such as a strike-through font or light green background).
- Click "OK" to apply.
Now, whenever you interact with the checkbox, the associated row will automatically format itself, providing immediate visual feedback on your progress.
Troubleshooting Common Issues
Despite the simplicity of the process, users occasionally encounter roadblocks. Here are the most frequent issues:
- Checkbox won't move or delete: Because checkboxes are objects, they can sometimes "stick." Hold the
Ctrlkey while clicking the checkbox to select it without triggering the toggle action. This allows you to drag, resize, or delete the object. - Checkbox moves when cells are resized: To prevent this, right-click the checkbox, go to Format Control, select the Properties tab, and choose "Move but don't size with cells."
- The Checkbox is invisible: If you have accidentally set the font color to white or the object is behind another layer, you may not see it. Ensure you are in "Design Mode" (available on the Developer tab) to easily identify all objects on your sheet.
Professional Best Practices for Large Datasets
If you are managing a large project with hundreds of tasks, adding checkboxes manually is inefficient. While Excel 2016 does not have a "drag-fill" feature for checkboxes that links them automatically to relative cells, you can speed up the process by creating one checkbox, then using the "Duplicate" (Ctrl + D) command. Note that you will still need to manually link each one to its respective cell in the Format Control dialog, which is a common limitation of the 2016 version.
For workflows involving thousands of items, consider whether a checkbox is necessary. In some cases, a simple data validation list containing "Yes" and "No" might be more scalable and easier to manage than hundreds of individual floating objects.
Frequently Asked Questions
Can I insert multiple checkboxes at once in Excel 2016? No, Excel 2016 does not provide a native bulk-creation tool for form control checkboxes. You must insert them individually or duplicate them and adjust the cell links one by one. This is a manual process designed for precision rather than speed.
Will my checkboxes work if I send the file to someone else? Yes, as long as the recipient is using a compatible version of Microsoft Excel. Since checkboxes are embedded as standard objects within the workbook, they remain fully functional when the file is shared or migrated to a different computer.
Can I change the size of the checkbox? Form Control checkboxes have size limitations. You cannot change the size of the box itself via the font menu; the box size is tied to the system’s display scaling. You can, however, change the font size of the associated text label to make the item more readable.
What happens to my checkboxes if I save as a CSV file?
Checkboxes are objects, not data. If you save your workbook as a CSV (Comma Separated Values) file, all objects—including checkboxes and their associated macros—will be lost. Always save your work in the native .xlsx or .xlsm format to preserve these elements.
Do I need to enable Macros to use checkboxes? No. Form control checkboxes are built into the standard Excel environment. As long as you are using a standard workbook, you do not need to enable macros or worry about security warnings related to VBA code to use simple checkboxes.
Final Next Steps
To master this feature, start by creating a simple "To-Do" list in a new workbook. Enable the Developer tab, add five checkboxes, and link them to a column that tracks the status of each item. Use conditional formatting to strike through completed tasks. Once you have built your first interactive list, you will find that the ability to bridge visual controls with analytical formulas provides a significant boost to your productivity and task tracking capabilities in Excel 2016.
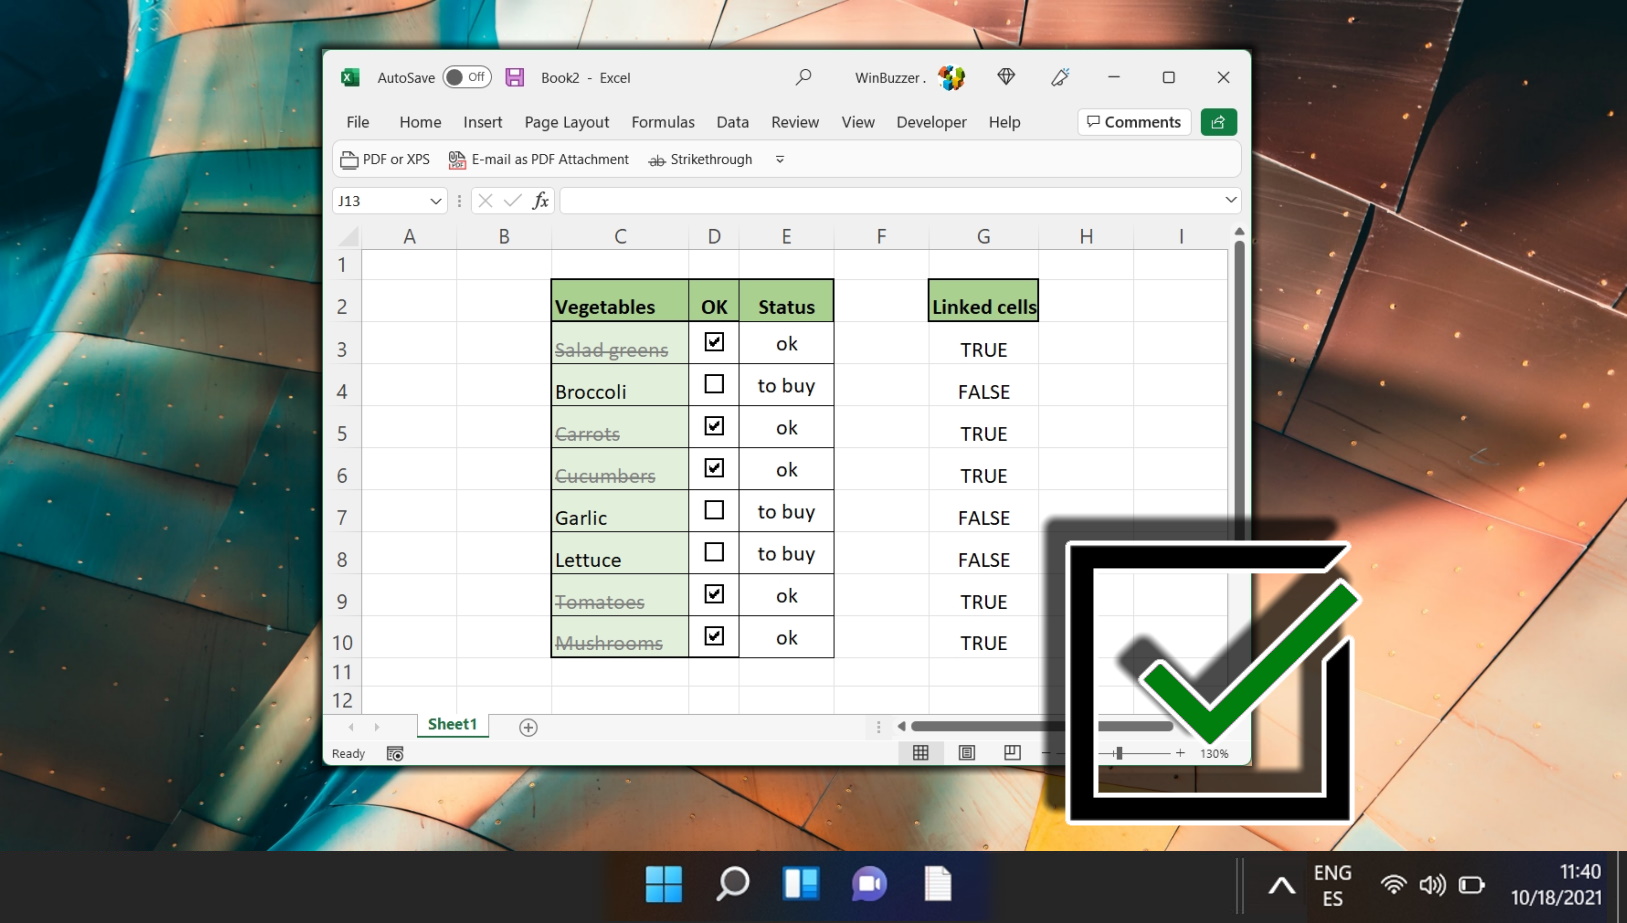
Image Gallery
Select an image to open it in a new tab.

Akira Tanaka
International Academic Trends Correspondent
